In this article, we have provided detailed steps for iPhone, Android, Mac, and Windows. So, irrespective of the platform you use Spotify on, you can clear and free some storage space. Firstly, let us get started by understanding the reasons why it occupies a lot of storage.
Why Does Spotify Use So Much Storage
Ever wondered how Spotify enables you to listen to music offline? Well, this happens due to a mechanism called caching. Now, to ensure you have a great listening experience without delays in songs, Spotify stores a part of the played song on your local storage. Now, when you replay it, it can easily play without lag. This process takes place for all songs and podcasts. Thus, the accumulation of hefty storage space on your device. The good part is that this cache data is temporary and even capped to a size limit depending on your storage. Besides, the music you newly listened to will replace the old songs regularly. For most devices, the cache is usually at 2-3GB after using the app regularly for a fortnight. Additionally, Spotify premium allows you to download music offline, which can take up a lot of storage space. Enabling the download option on a Spotify playlist means that every new song you add will be automatically offline. So, turning on downloads can be another reason why Spotify is taking up so much storage space. Learn how to easily resolve this issue in the next section.
3 Ways to Reduce Spotify Storage on iPhone, Android, Mac, and Windows
The Spotify app is user-friendly as it comes with an easy-to-navigate user interface. This helped us better understand why Spotify was taking up so much storage. There are 3 ways to fix these issues – you can clear Spotify cache, delete downloads, and reduce the download size. While the methods are straightforward for mobile devices, they take a few extra steps to follow if you’re using Spotify on Windows and Mac. However, we have covered them all in simple and easy-to-understand steps for you.
1. Clear Spotify Cache
Now that we understood how cache works, here’s a step-by-step procedure to delete cache on iPhone, Android, Windows, and Mac. As soon as you clear the cache, you will notice that Spotify will occupy a significantly lesser amount of storage space.
How to Clear Spotify Cache on iPhone
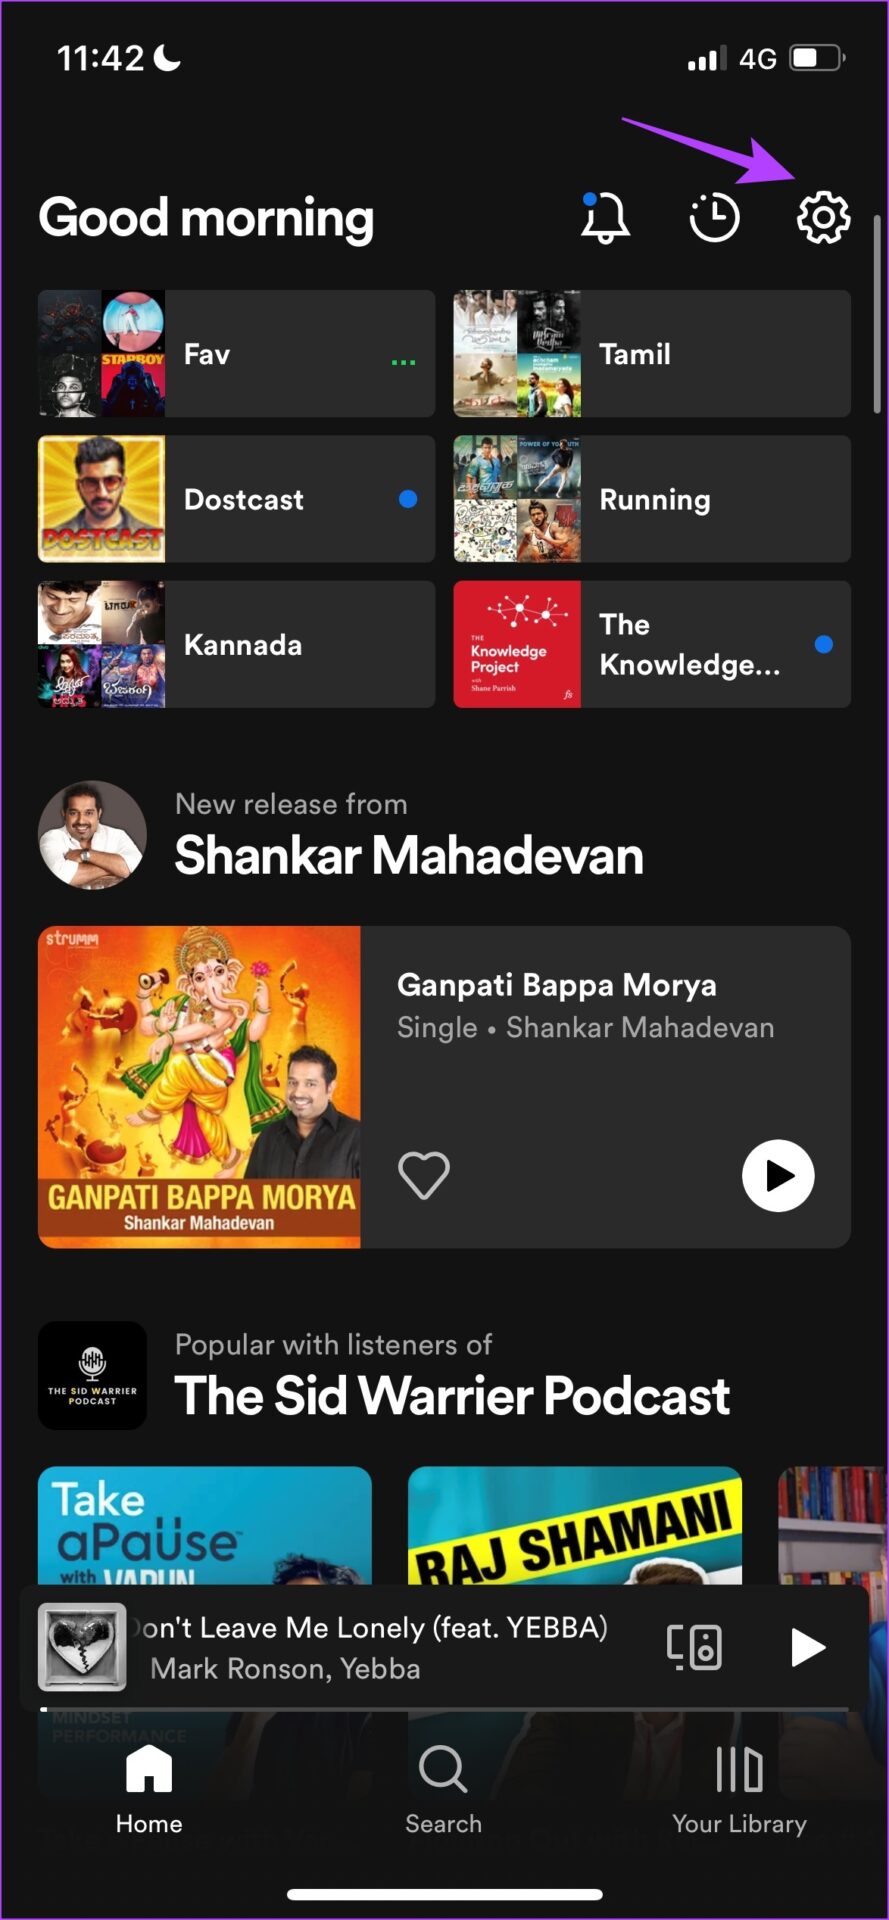
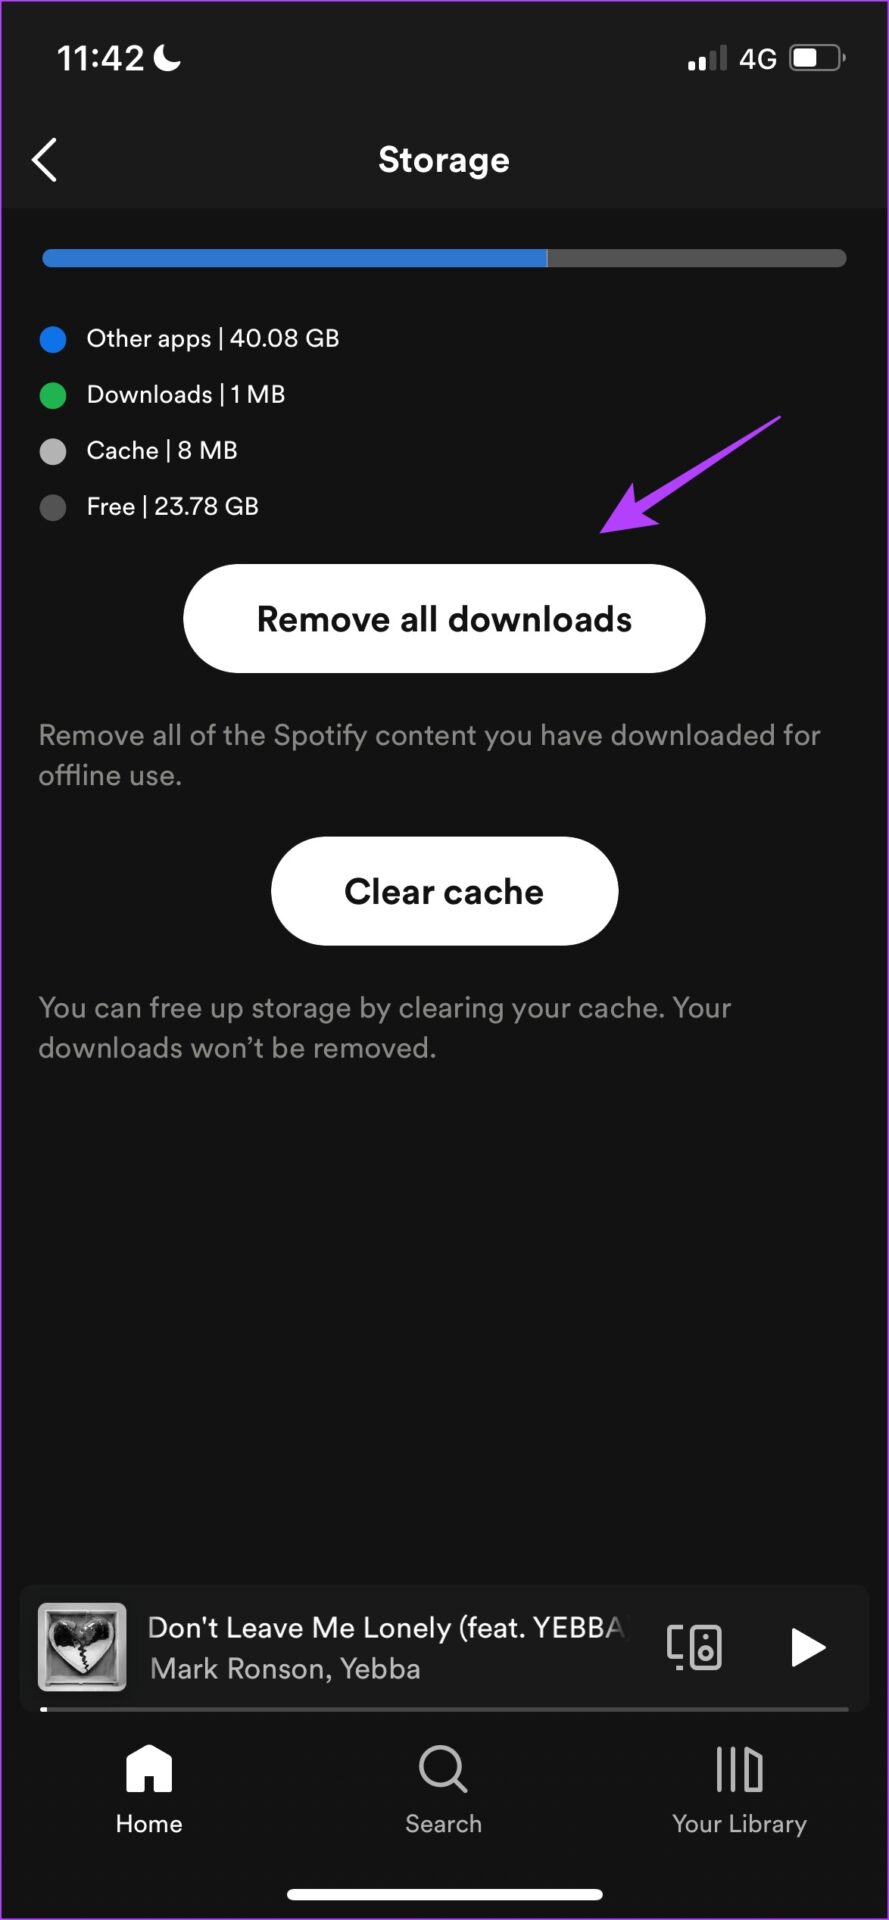
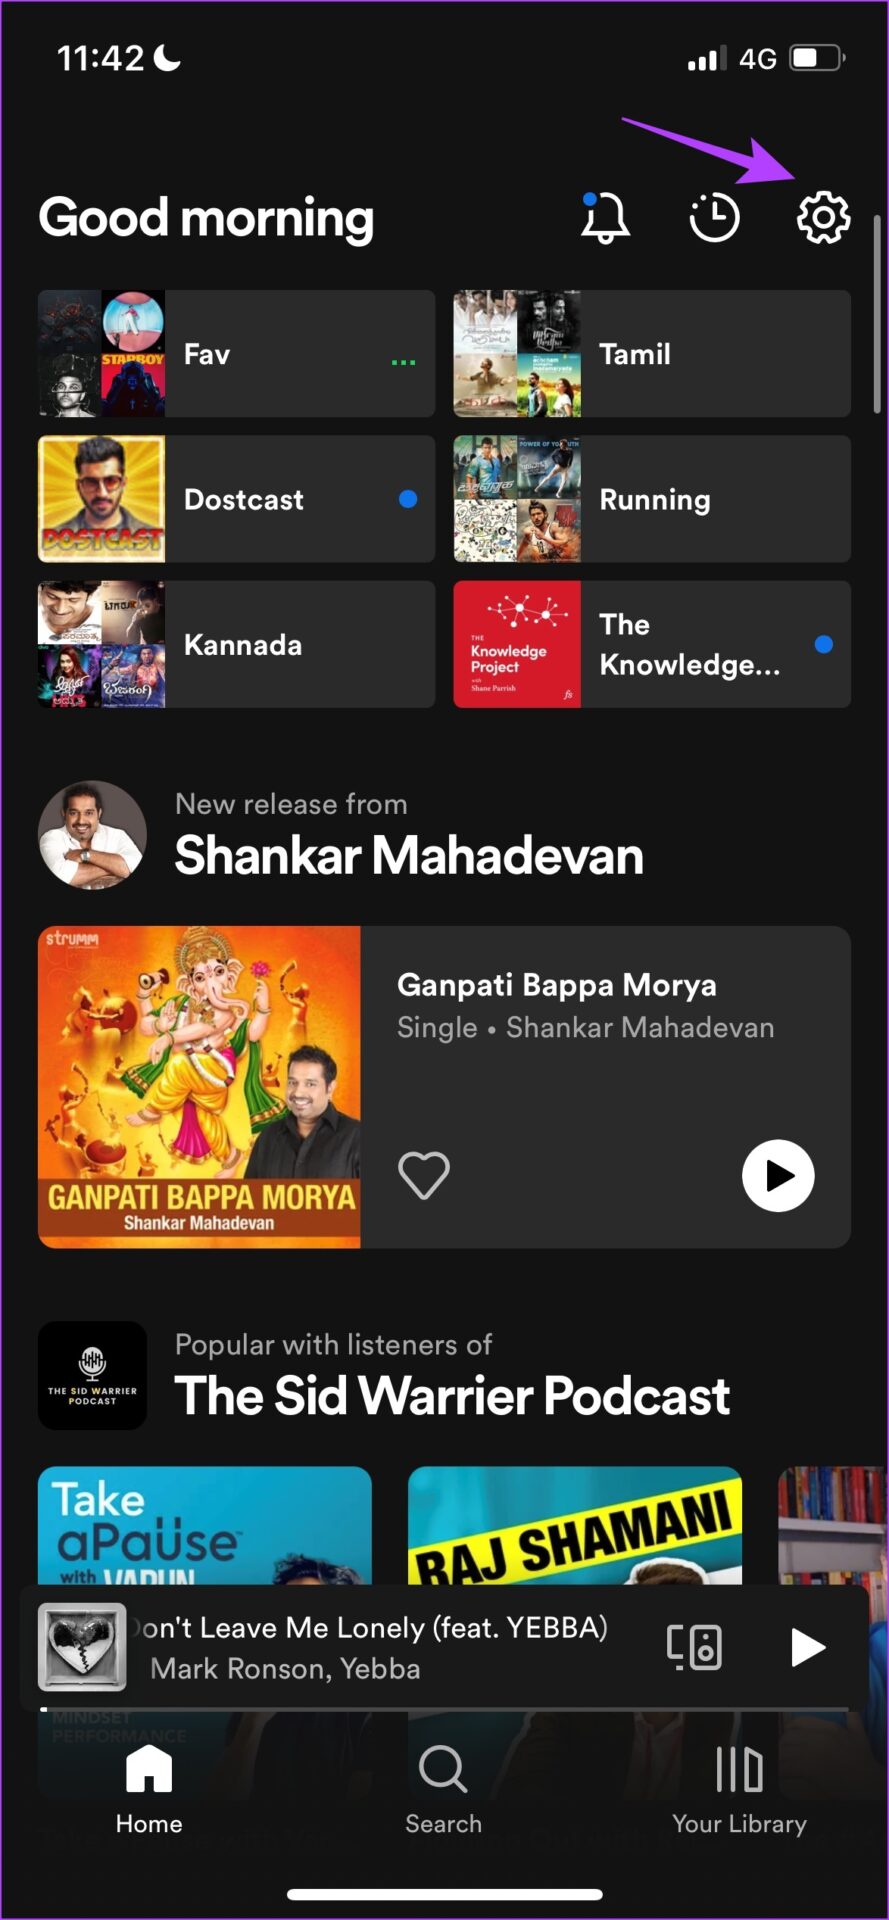
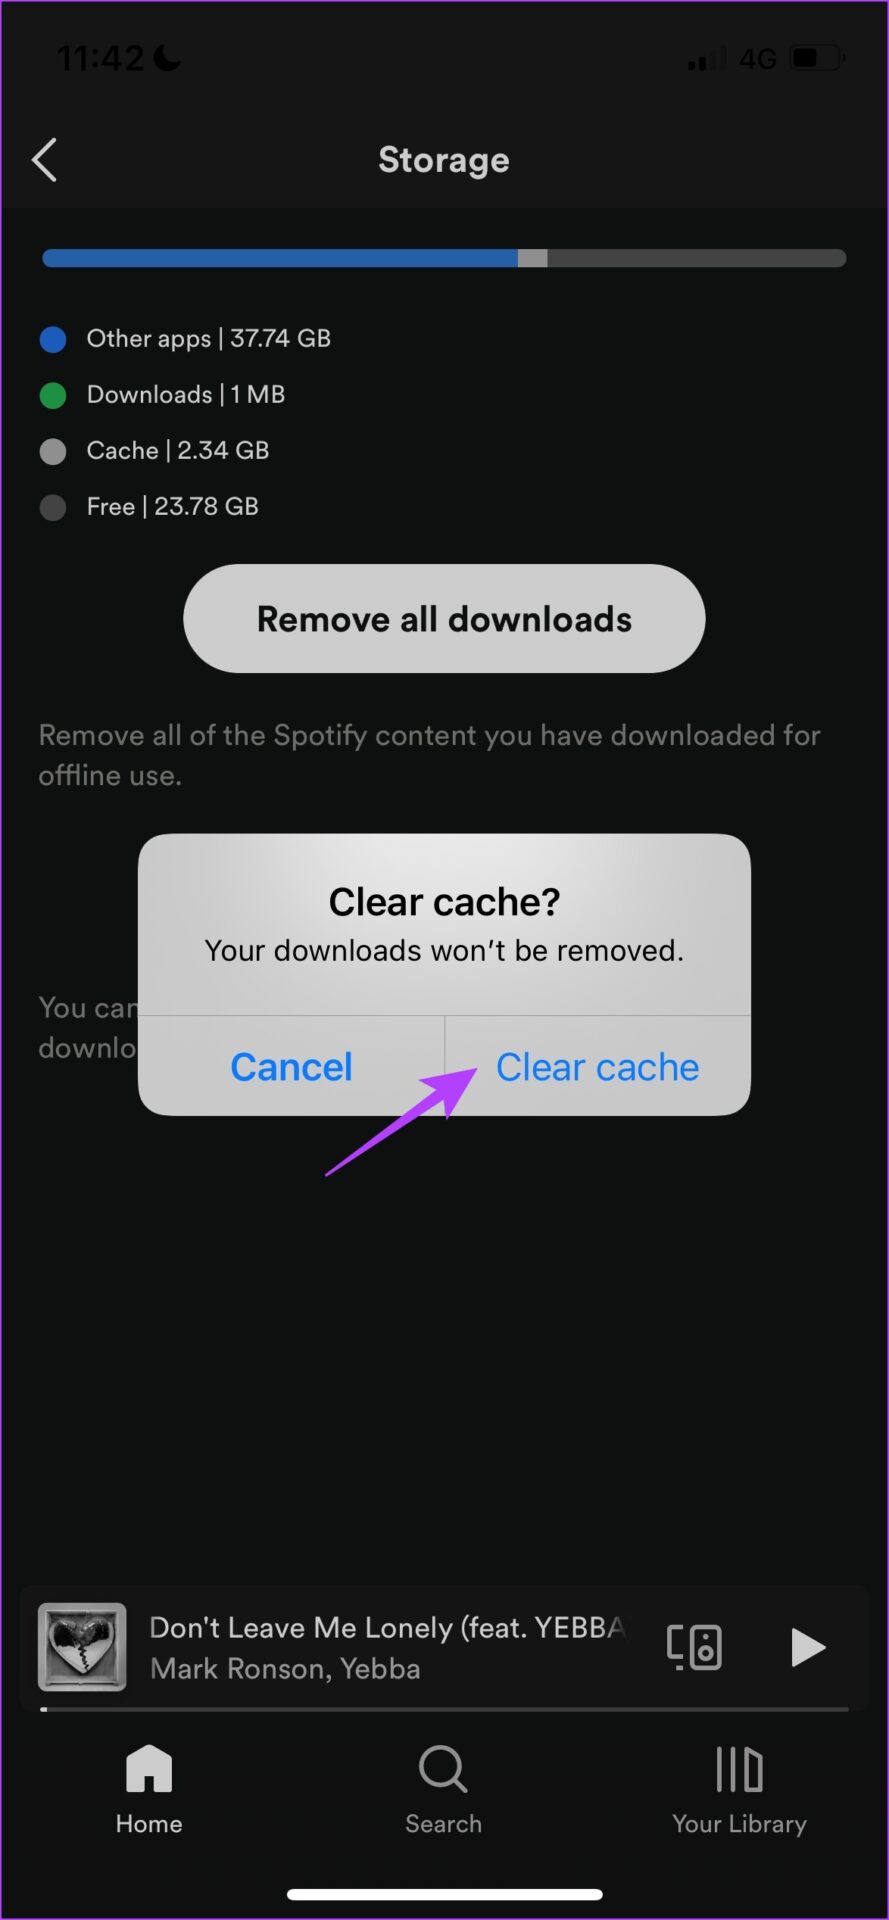
Step 1: Tap on the Settings icon in the Spotify app and select Storage. Step 2: Tap on Clear Cache and select Clear cache again to confirm. This is what you need to do to clear the cache on your iPhone. Now, if you are on the other side and use an Android device, read along.
Delete Spotify Cache on Android
Step 1: Tap on the Settings icon in the Spotify app and tap on Clear cache. Step 2: Tap on Clear cache to confirm. These were the steps to clear the cache on mobile devices. Spotify has applications for both Mac and Windows as well. So in the next two sections of the article, you will learn how to clear the cache on both systems.
Clear Spotify Cache on Mac
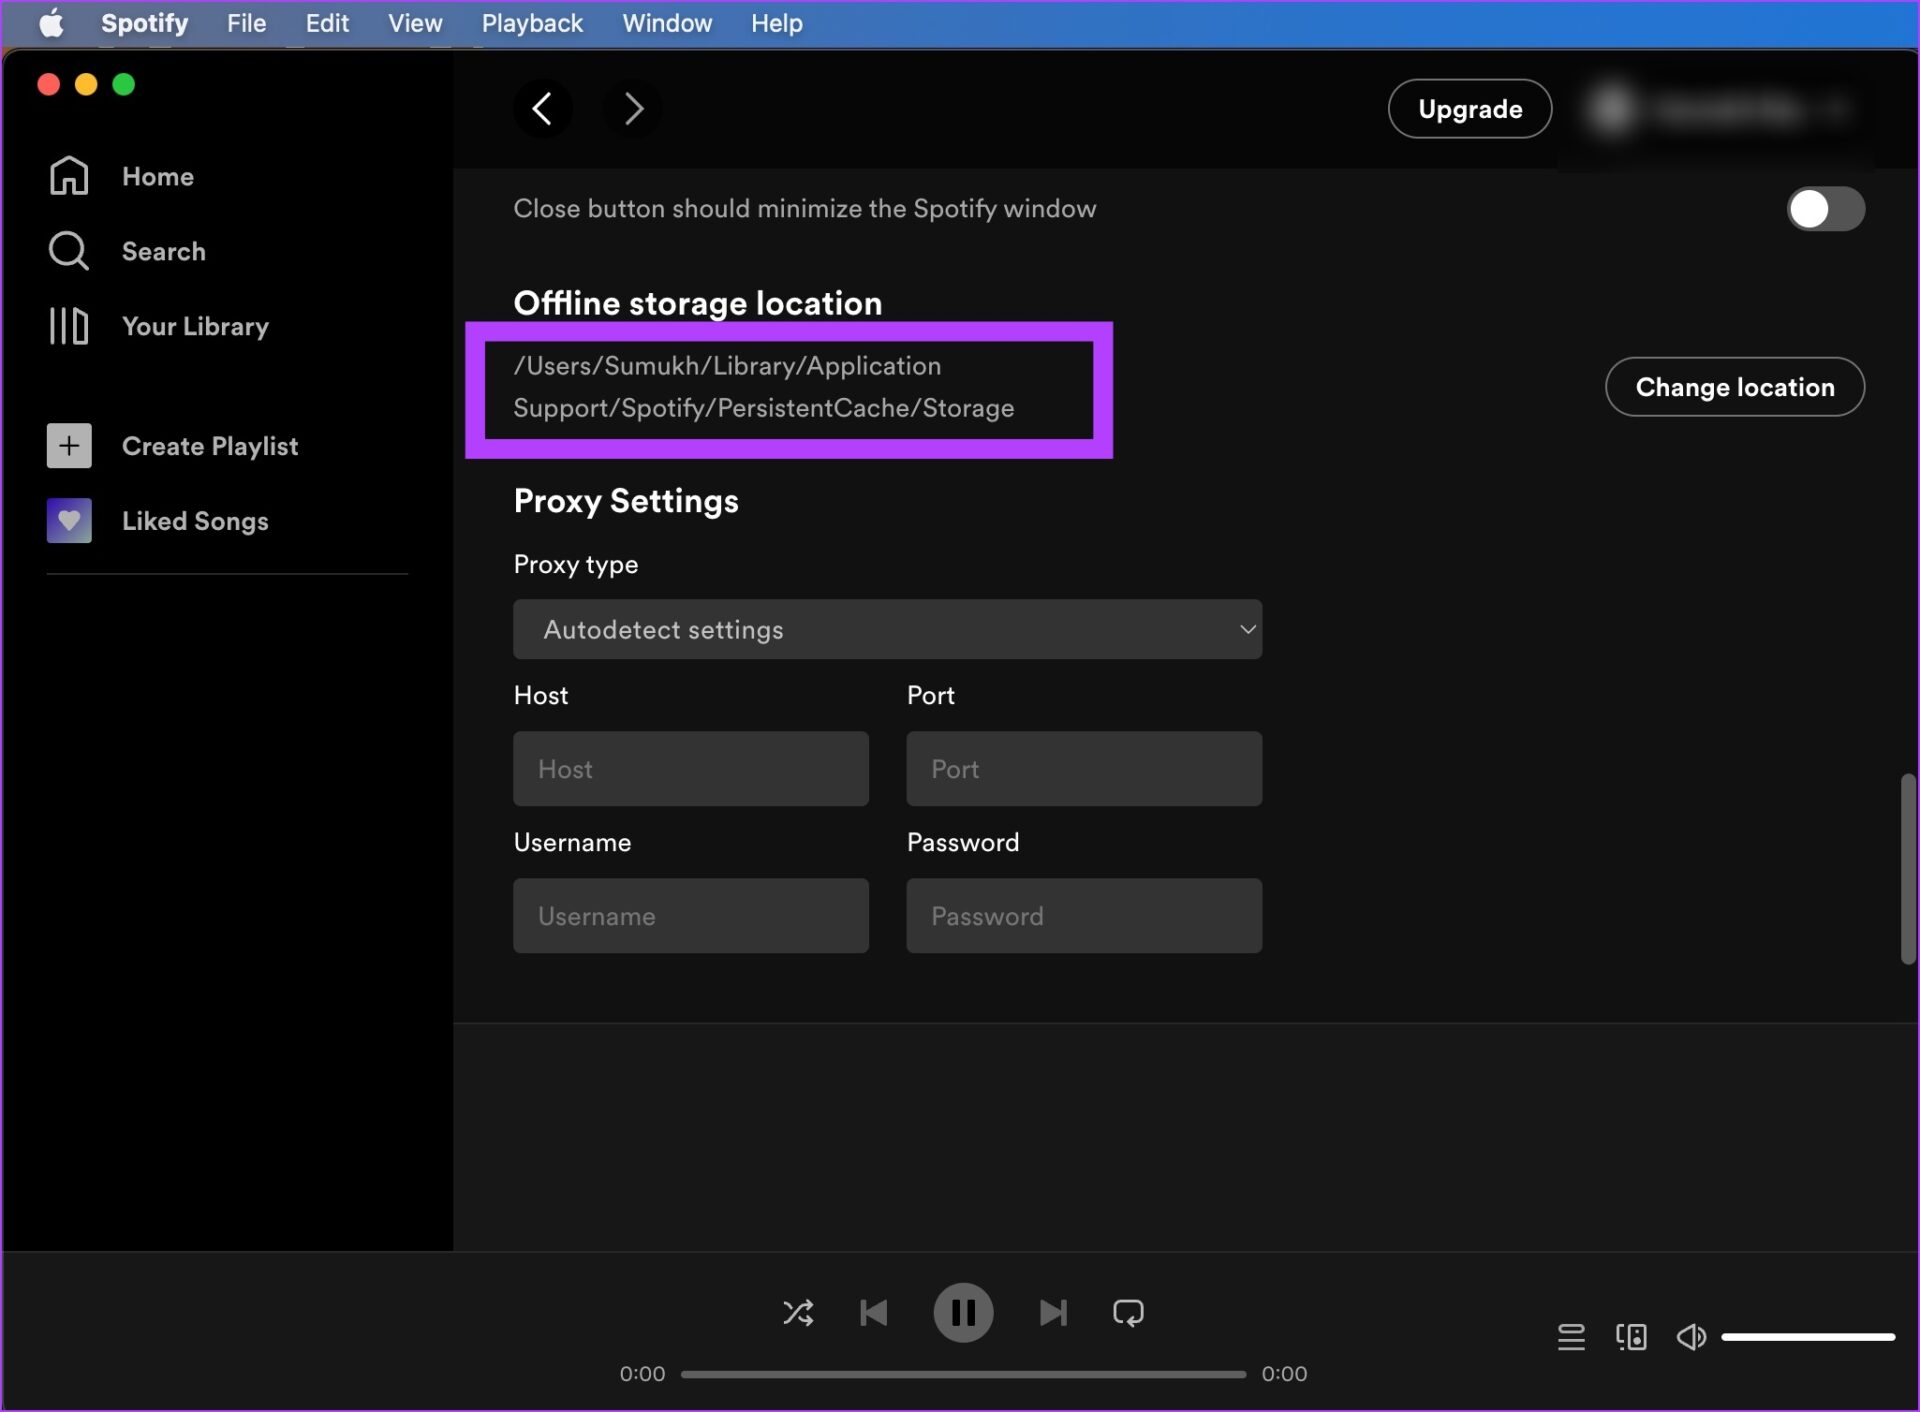
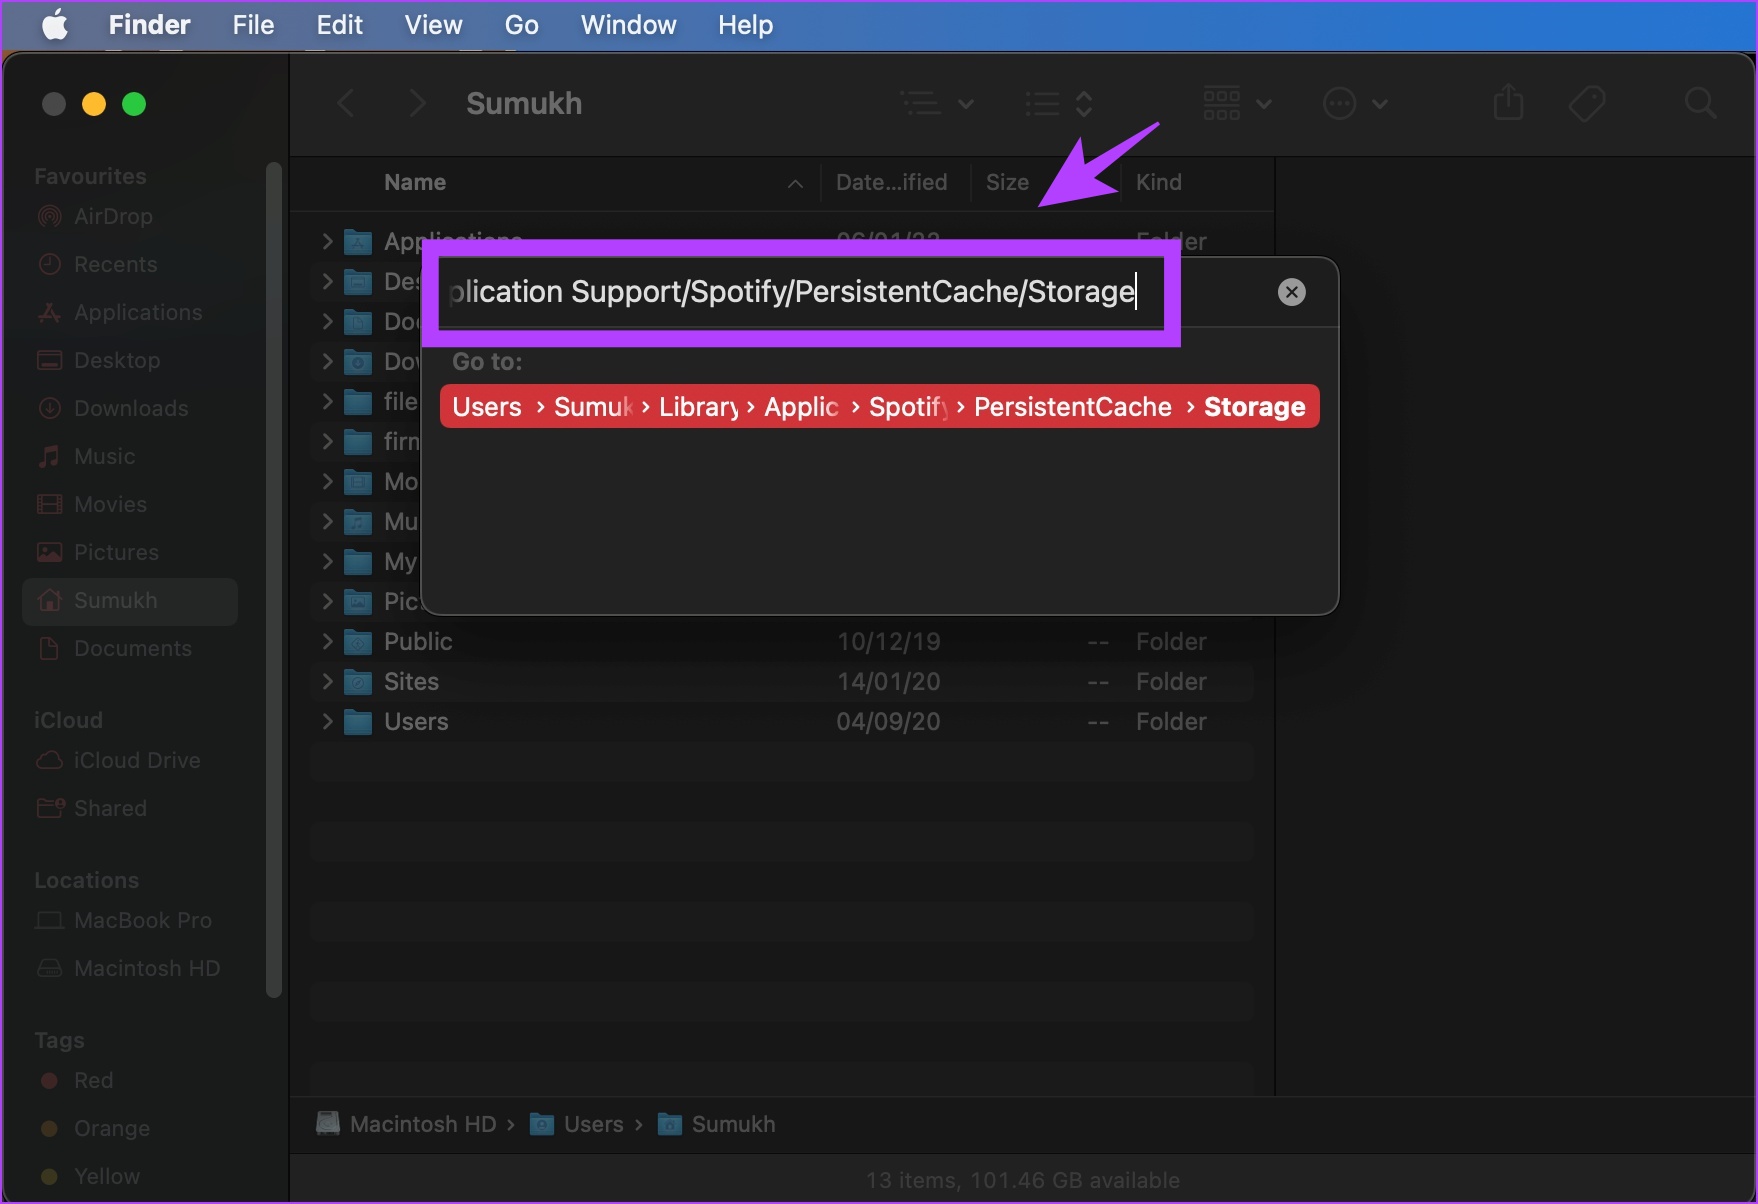
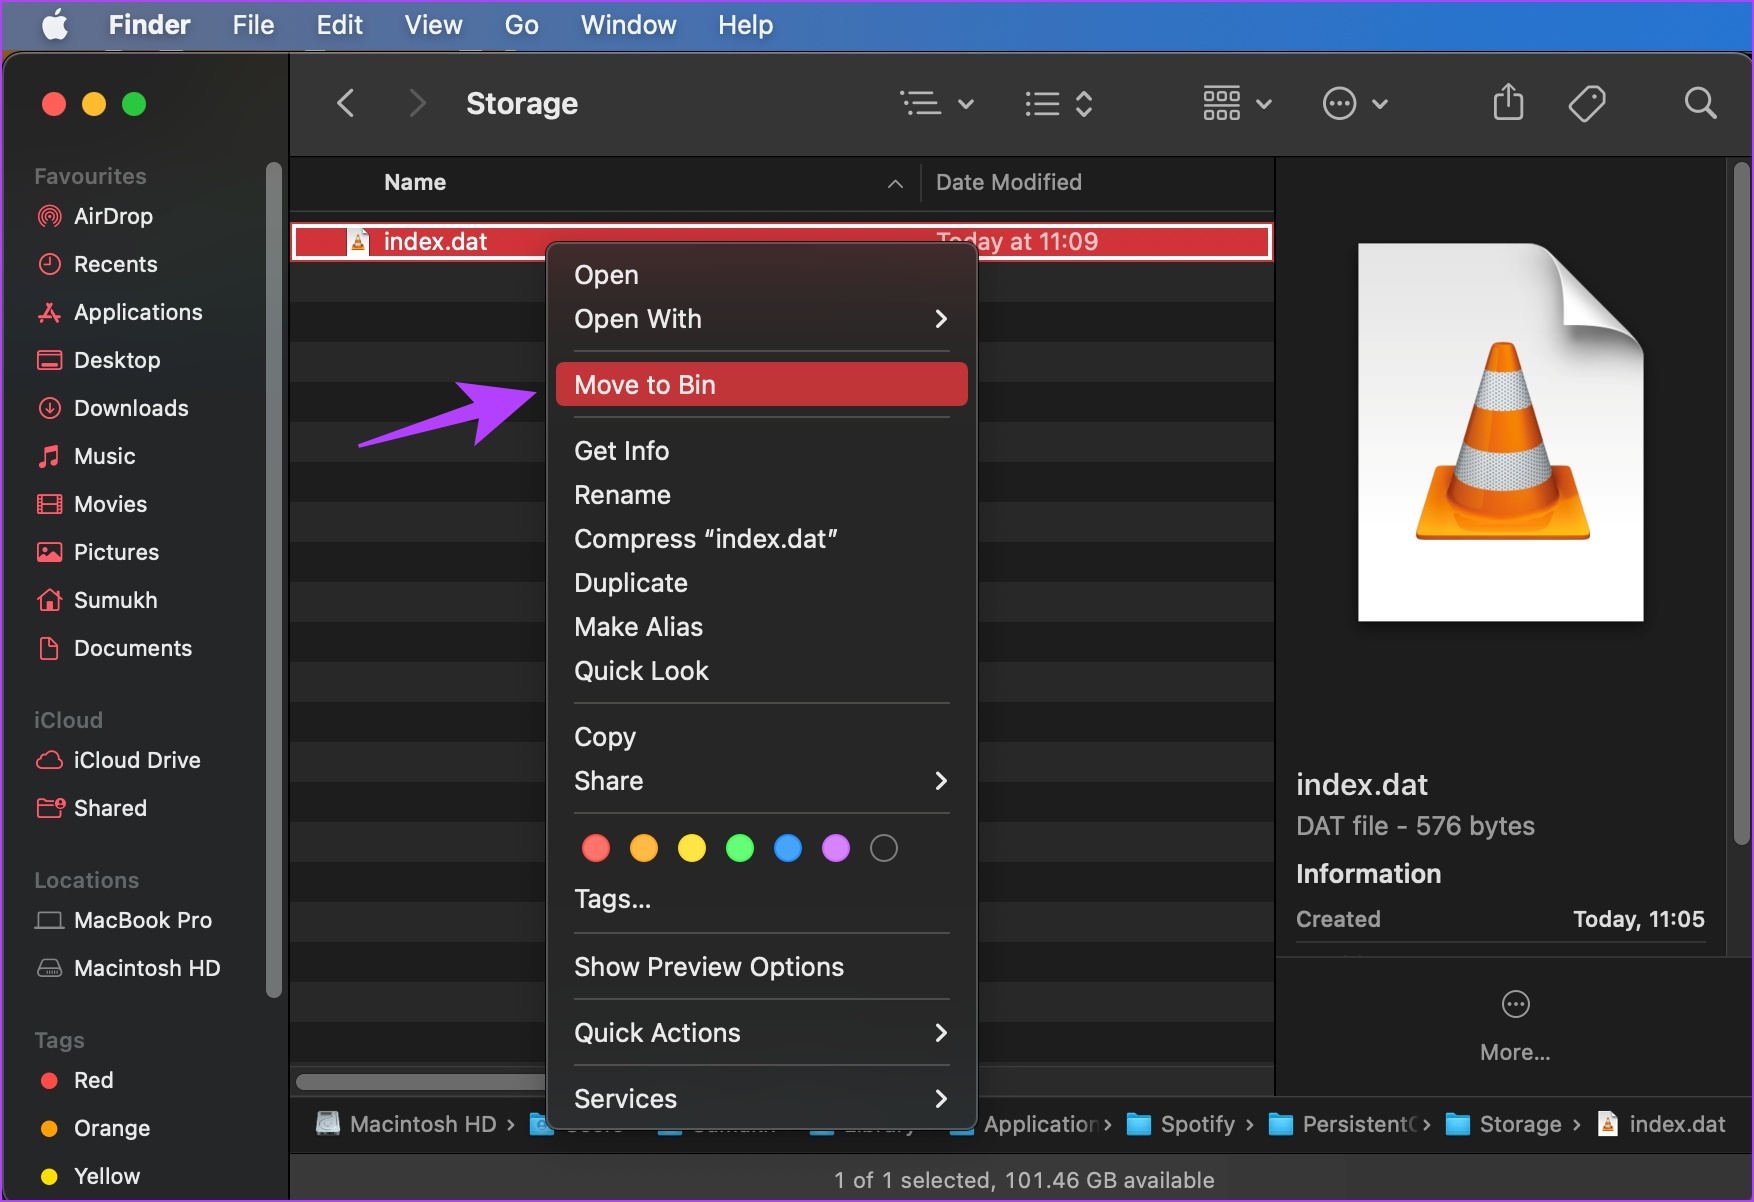
Step 1: Open the Spotify app, click on the Spotify option in the toolbar, and select Preferences. Step 2: Select and copy the path where offline storage is located. Step 3: On the main toolbar of your Mac, click on Go and select ‘Go to Folder.’ Step 4: Now, paste the path and go to the location. Step 5: Select all the files, and use the ‘Move to Bin’ option. Depending on your usage, you might have a different amount of files. As we did not seem to use Spotify a lot on our Mac, there was barely any cache. This is all you need to do, to clear the cache on your macOS devices. If you use a Windows machine, move to the next section.
Remove Spotify Cache From Windows PC
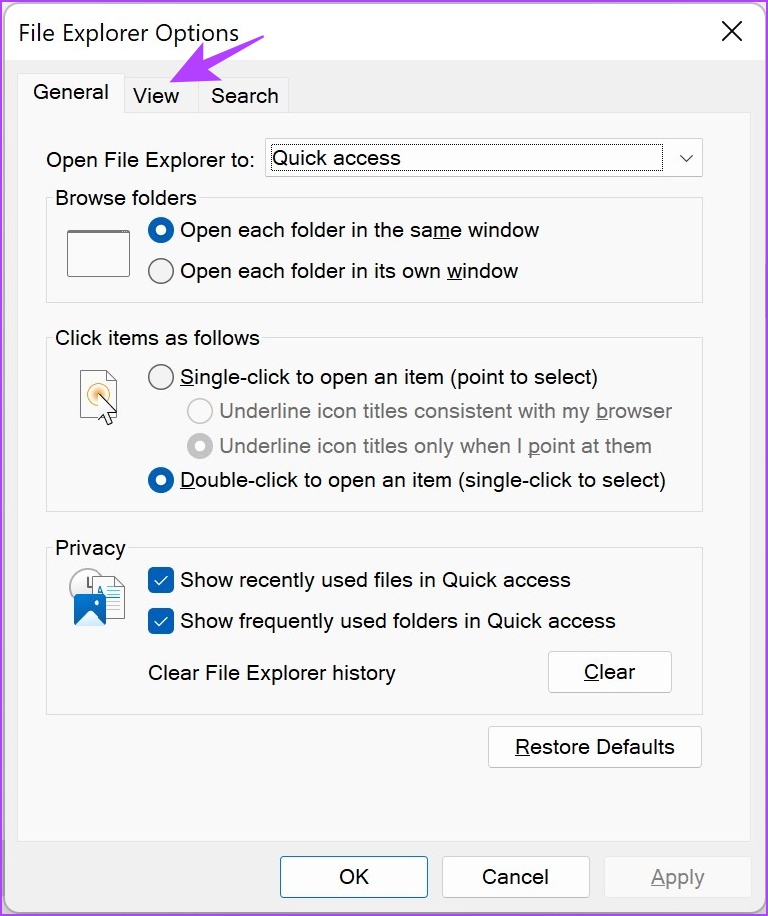
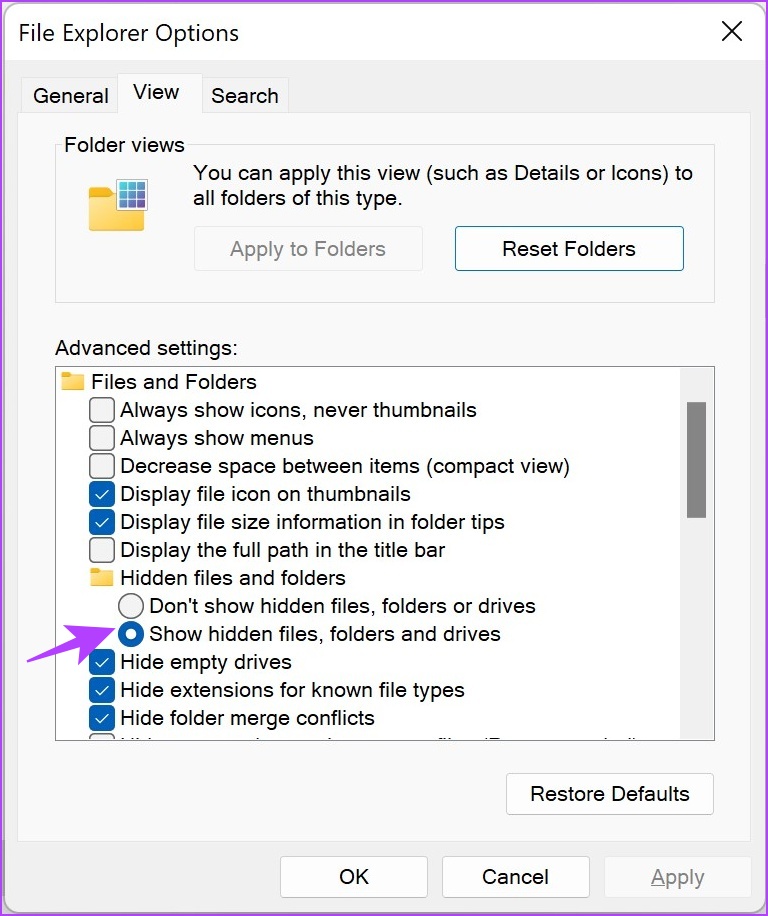
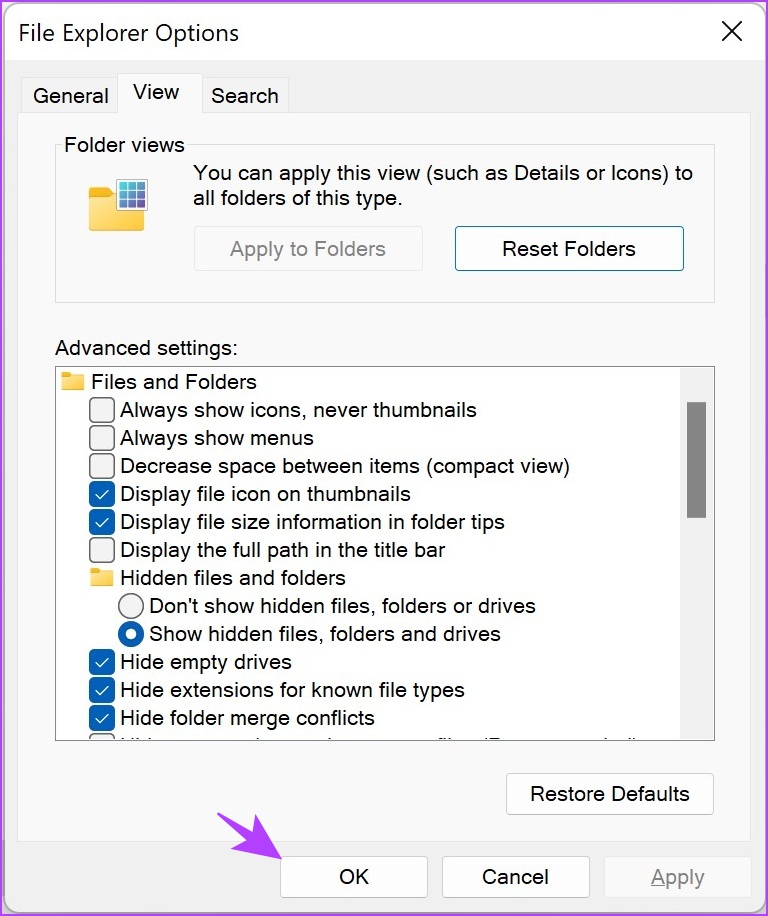
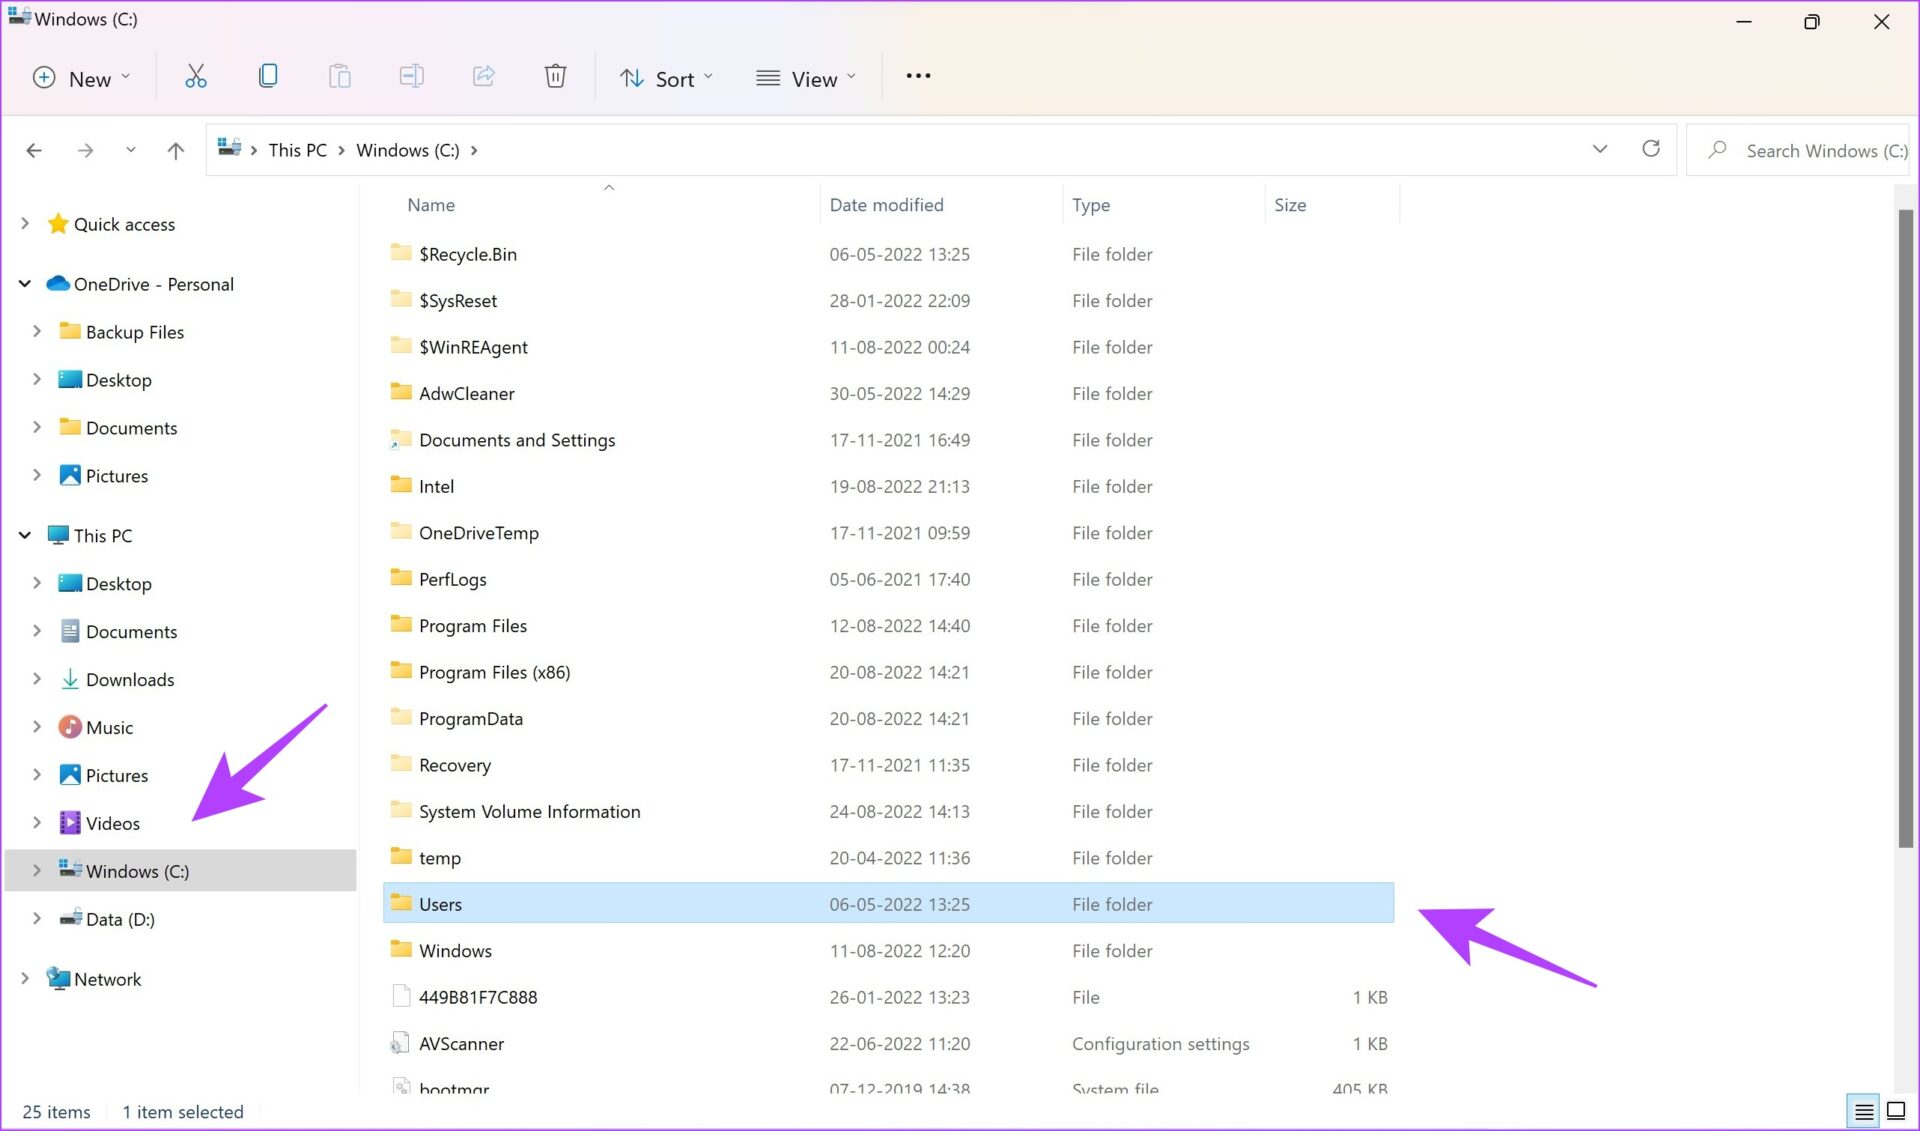
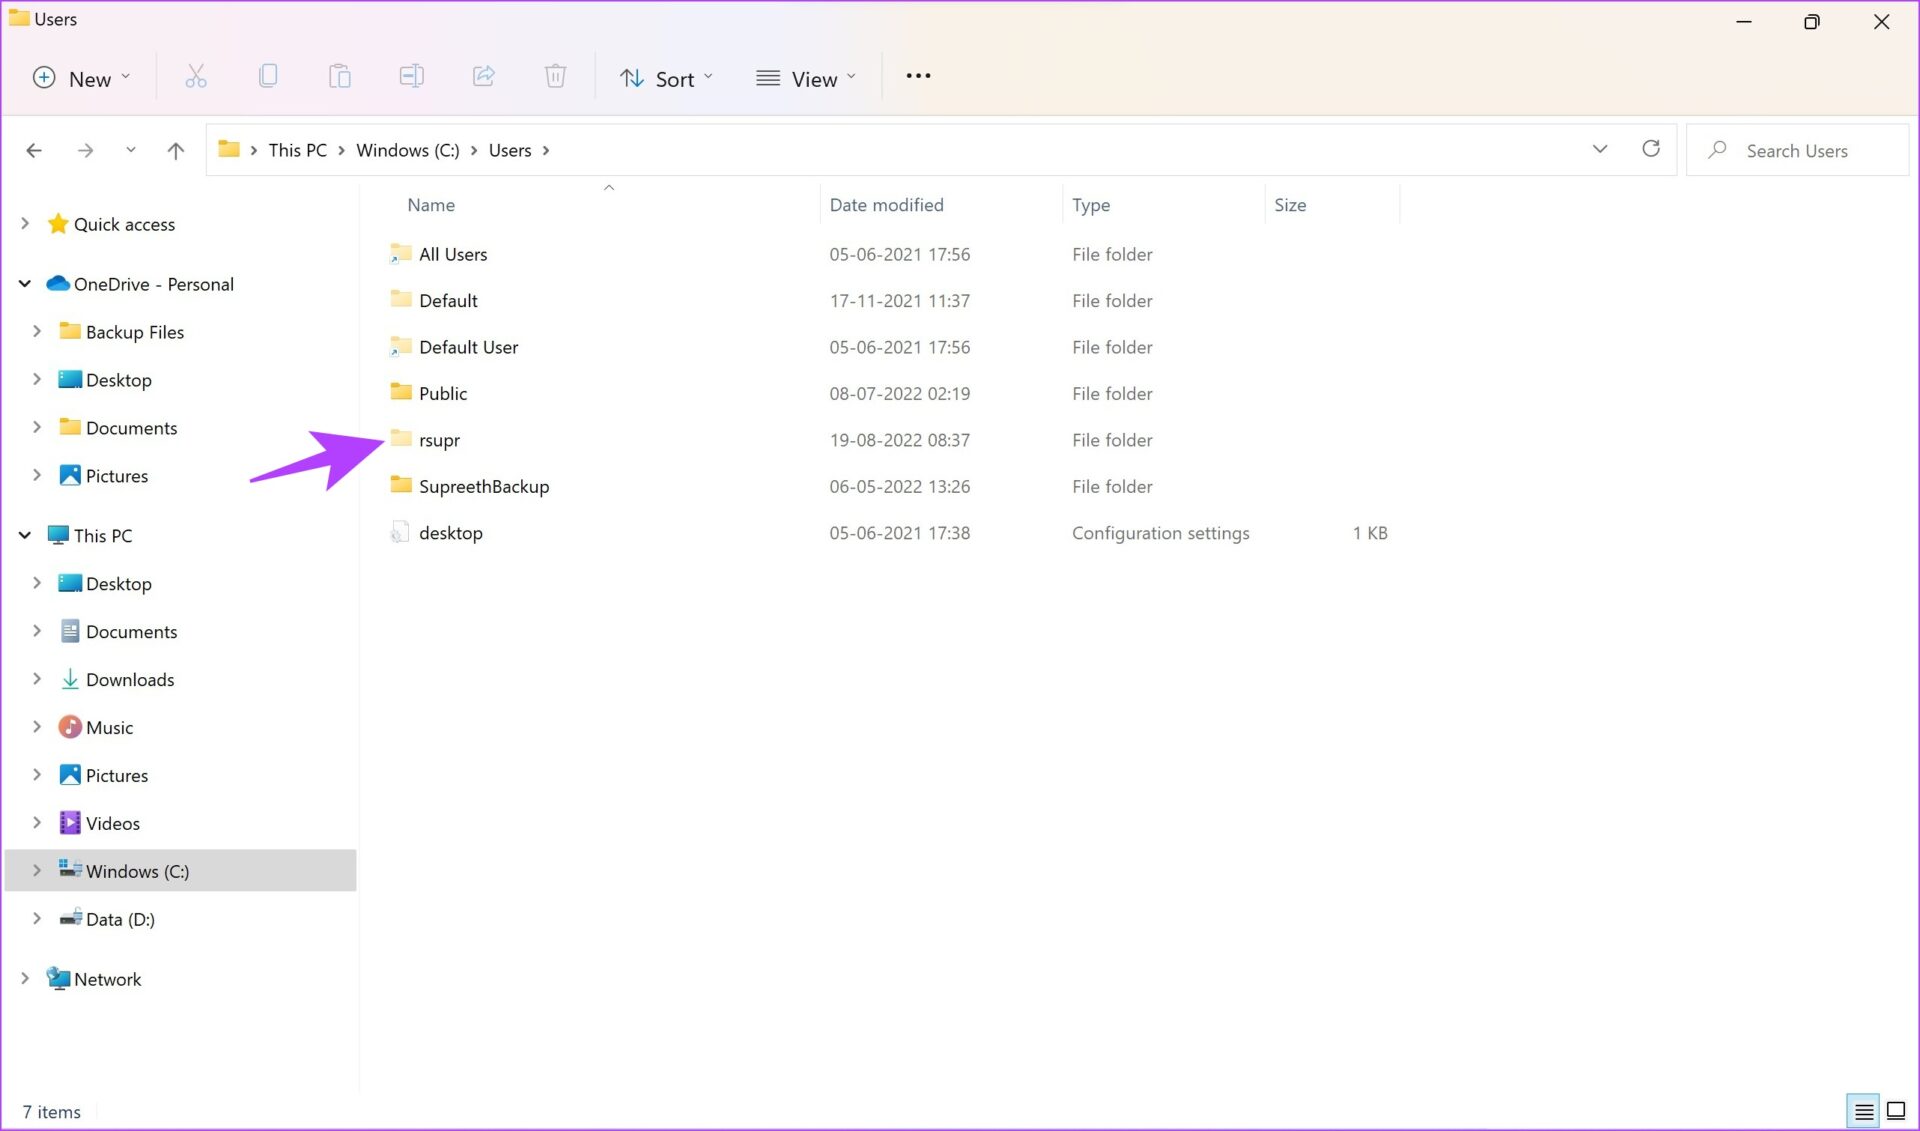
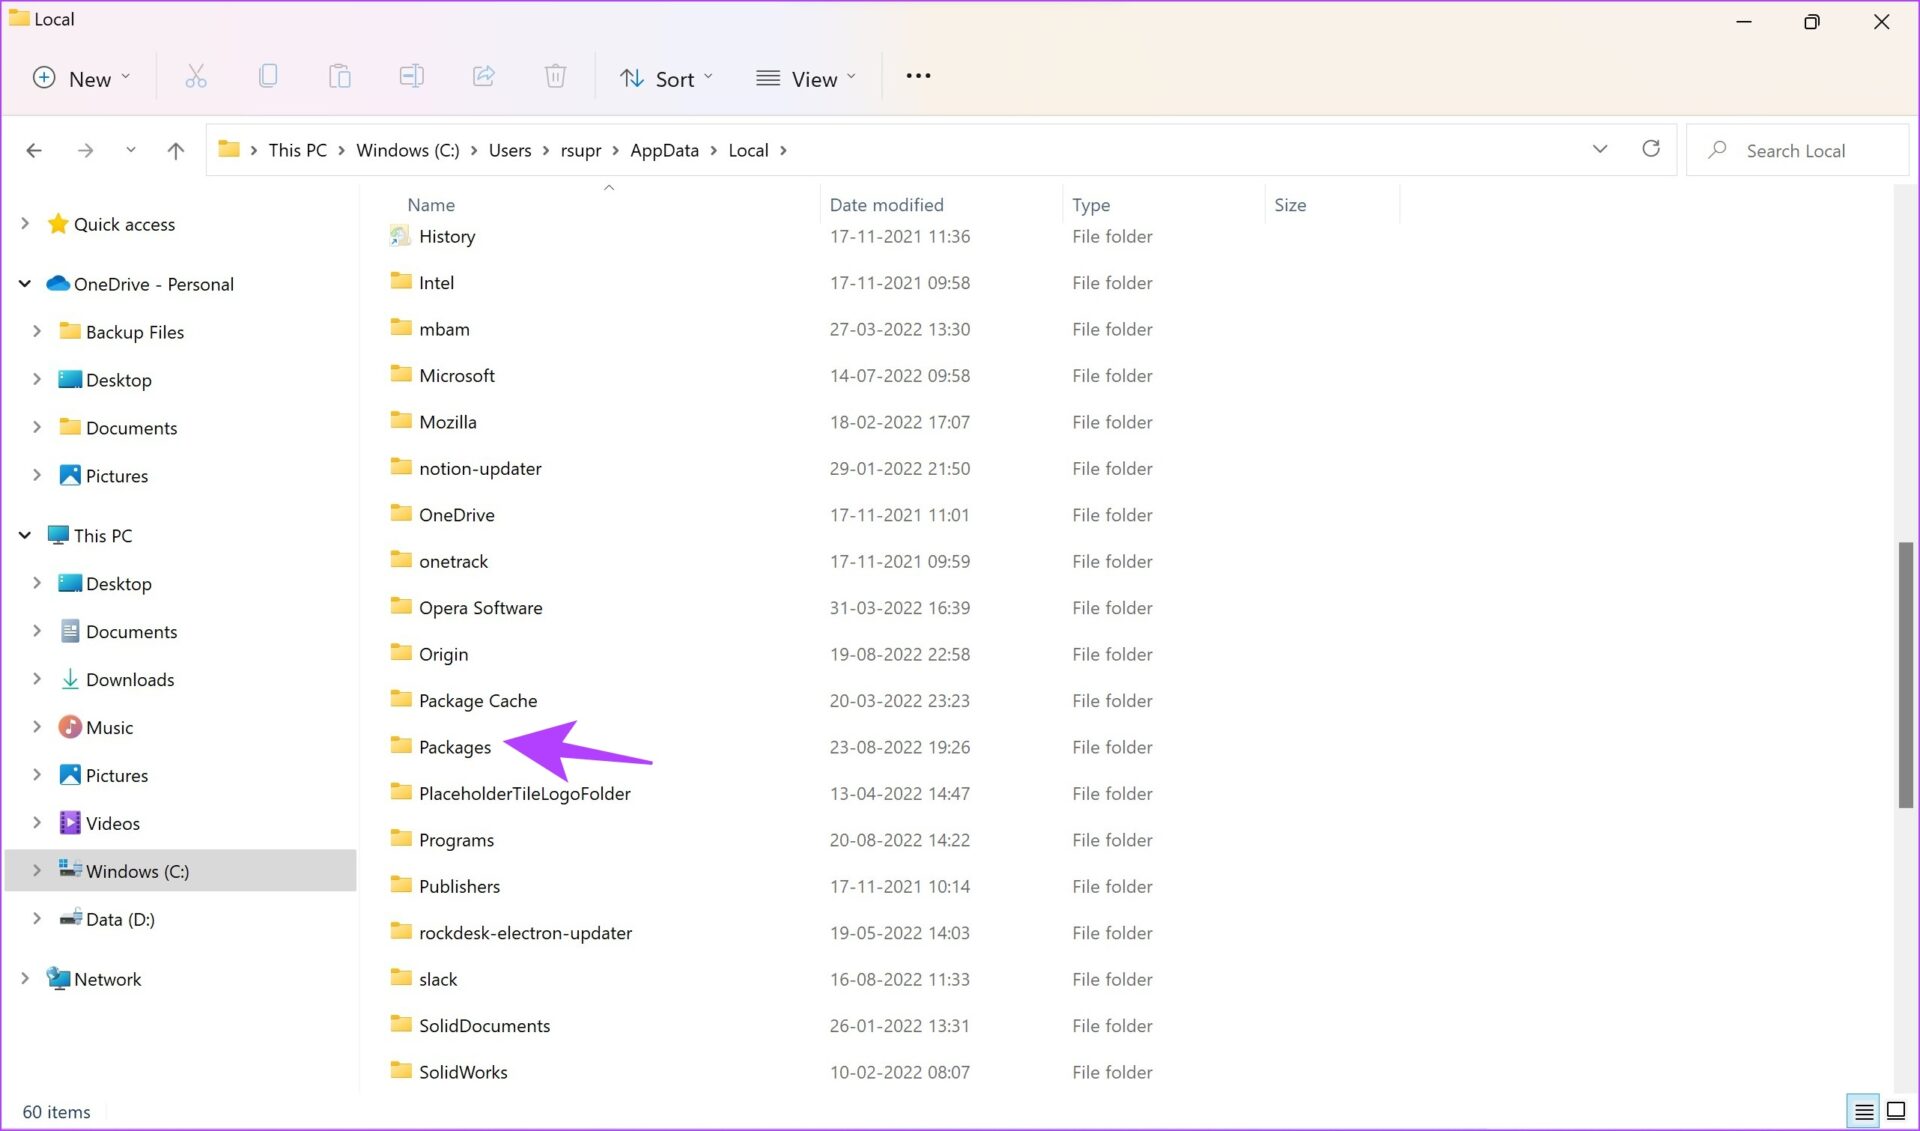
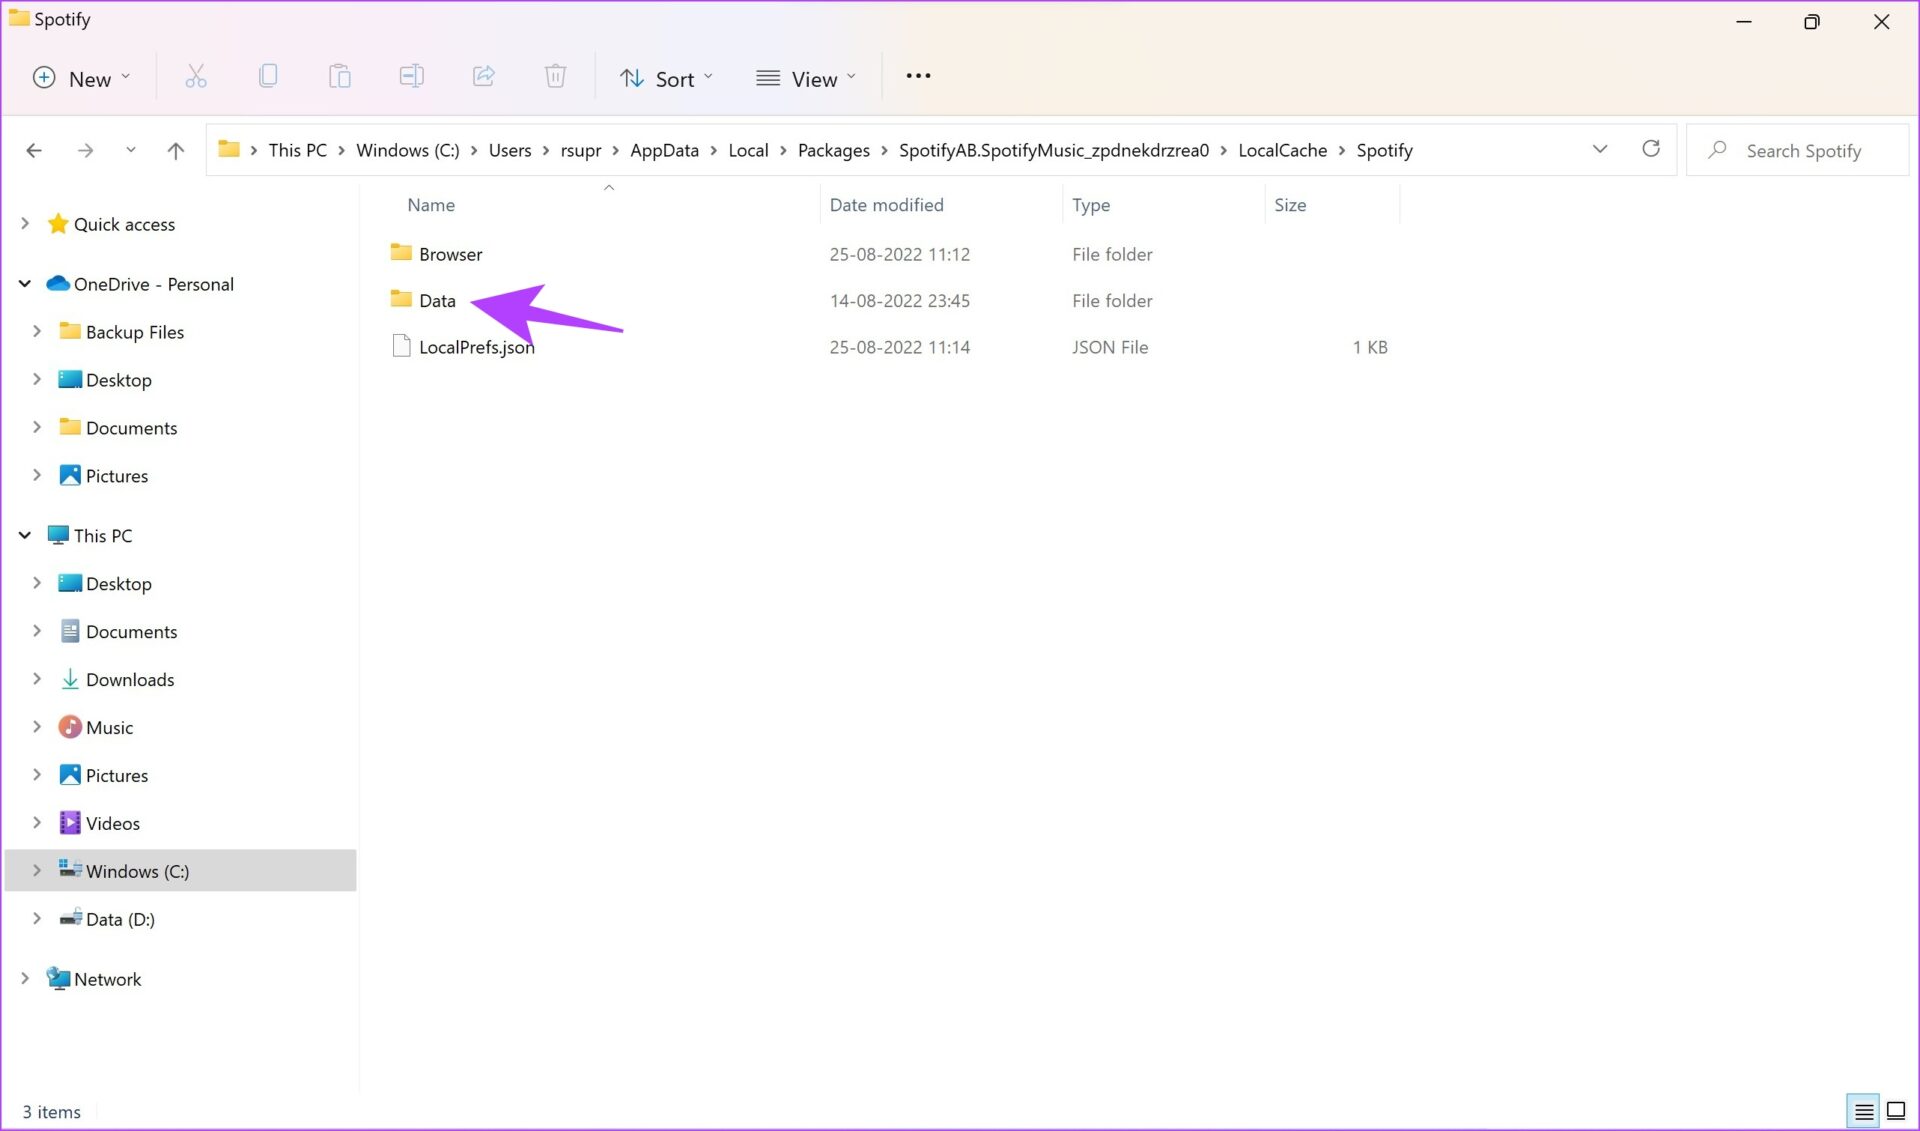
Similar to Mac, cache files of Spotify need to be located and then deleted on Windows. And these files and folders are hidden by default. Here’s how to find those files and delete them. Step 1: In the start menu, search for ‘File Explorer Options’ and click on the first result. Step 2: Once opened, click on View. Step 3: Check the option for ‘Show hidden files, folders, and drives.’ Step 4: Click on OK to apply the settings. Step 5: Now, click on your C Drive -> Select Users. Step 6: Select your username. Step 7: Now, go to AppData -> Local -> Packages. Step 8: Select a folder containing the keyword ‘Spotify’ Step 9: Next, go to LocalCache -> Spotify -> Data. Step 10: Select all folders and click on Delete. This is how you can delete all the cached files on Windows. Up next, we’ll show you how to remove downloaded files.
2. Remove Spotify Downloads
If you are a Spotify premium user, you have an option to download music offline. It is another reason why Spotify takes up so much device storage. Once you create a playlist and enable the download option, it will automatically download any new songs added to it. This means that your consent will not be taken every time, and you may lose track of the amount of music downloaded offline. Here’s a step-by-step procedure to remove your downloaded files on iPhone, Android, Mac, and Windows.
How to Delete Spotify Downloads on iPhone and Android
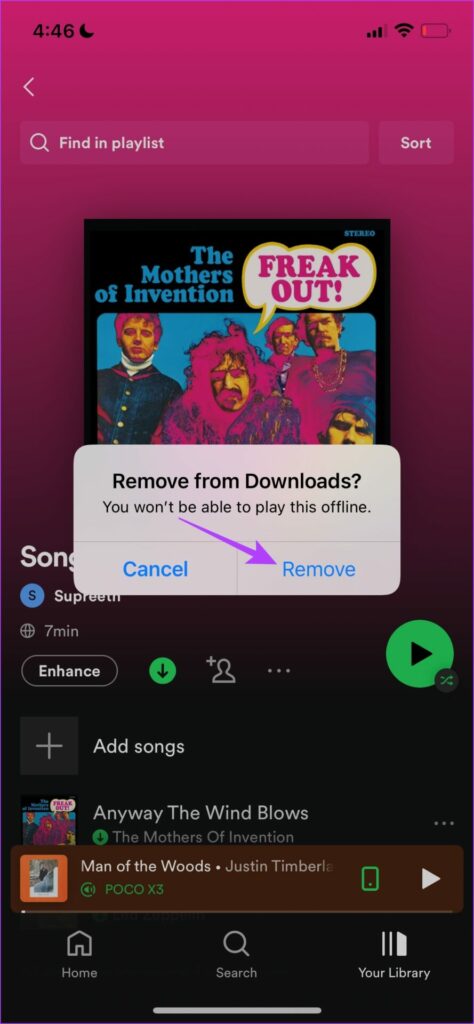
The process is similar on both iPhone and Android to delete downloads. However, the screenshots would differ. Step 1: Open the playlist with the download option enabled and tap on the download icon. Step 2: Click on Remove. This option will help you remove downloads from individual playlists. But, if you want to delete all downloads at once, here’s how you can do it. Step 1: Click on Settings in the Spotify app and go to Storage. Step 2: Tap on ‘Remove all downloads’ and select Remove to confirm. This is how to delete downloaded Spotify files from individual playlists or all at once on mobile devices. However, on Mac and Windows, locating all the downloaded files and deleting them at once may be risky as you would not want to remove any core files that affect the functionality. So you can only remove downloads from playlists individually, and here are the steps for the same.
Delete Spotify Downloads on Mac and Windows
All you need to do is to open the playlist which has the download option enabled. Click on the download icon, and all of your downloads will be automatically removed from the playlist.
3. Reduce Download Size of Spotify Files
In the last section, we helped you remove Spotify downloads from your devices. However, downloading and listening to music offline might be essential to many. So, a middle ground to save space and ensure you have music offline is by reducing the download quality. Here’s a step-by-step procedure to change the download size on all of your devices. Note: Once you change the download quality, Spotify will automatically re-download all the songs in that quality. Thus, saving you space.
Reduce the File Size in Spotify on iPhone
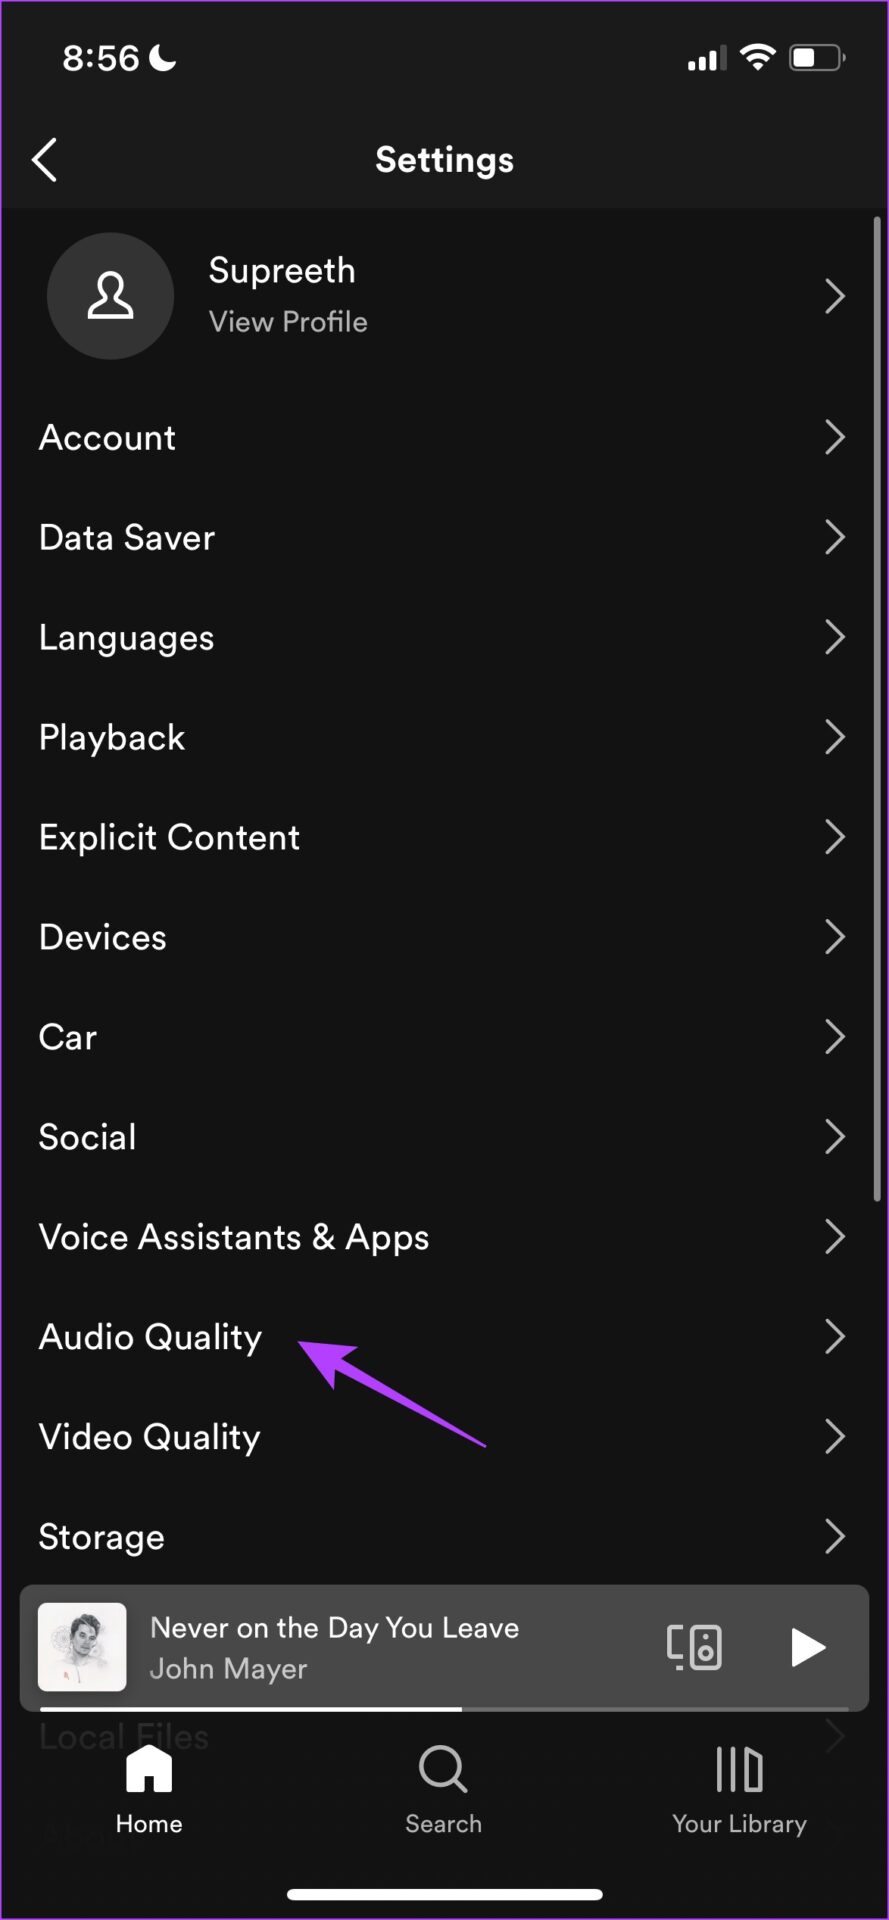
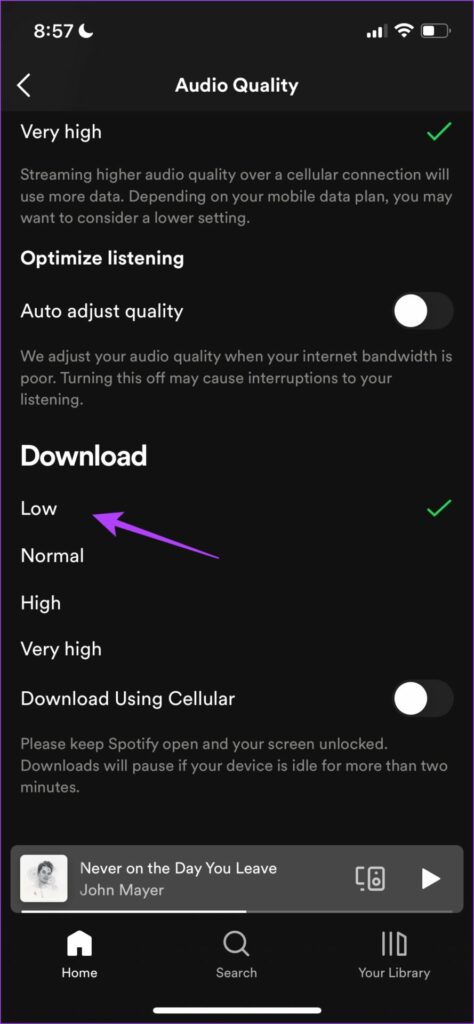
Step 1: Tap on Settings in the Spotify app and tap on Audio Quality. Step 2: Now, select your preferred quality under Download. The procedure to do the same is more or less similar on Android too. Read the next section to find out.
Change Spotify Download Quality on Android
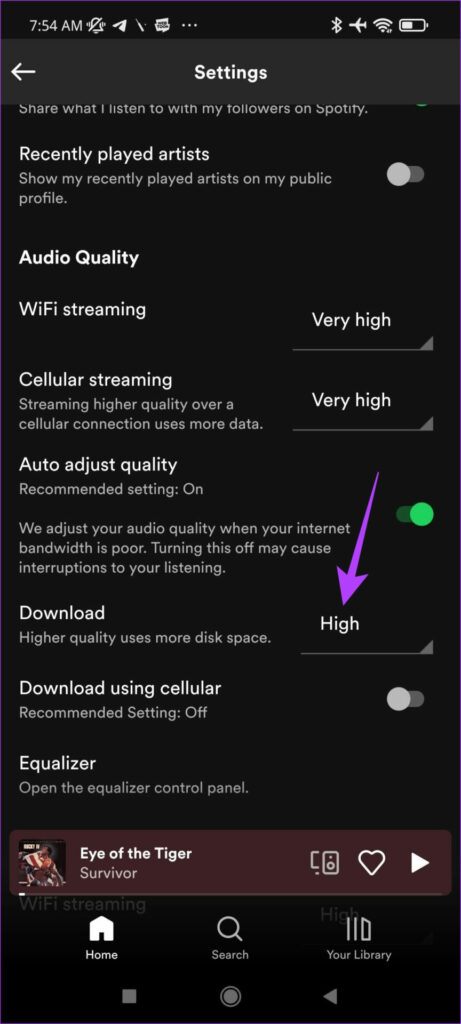
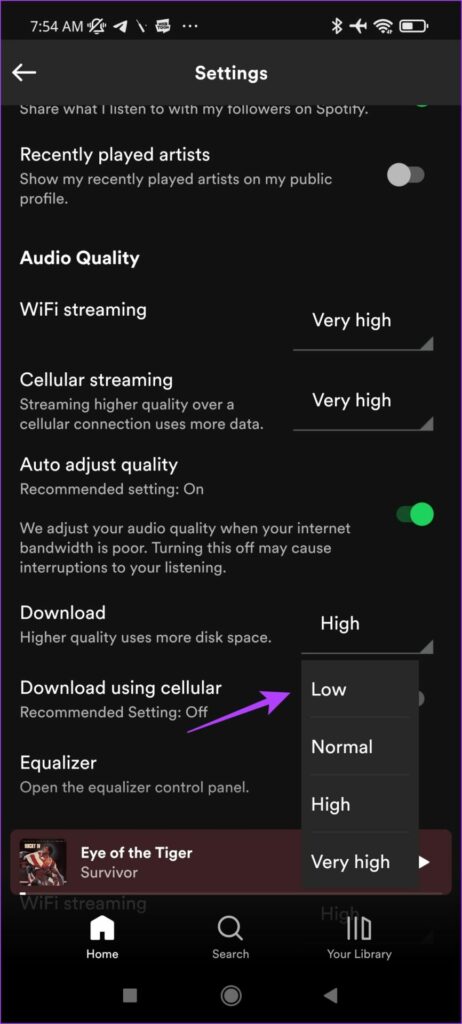
Step 1: Tap on Settings in the Spotify app and tap on the dropdown menu for Download. Step 2: Select your download quality. Thankfully, Spotify also has provided an option to change download quality on Windows and Mac. Here’s how to do it.
Download Spotify Files in Lower Quality on Mac
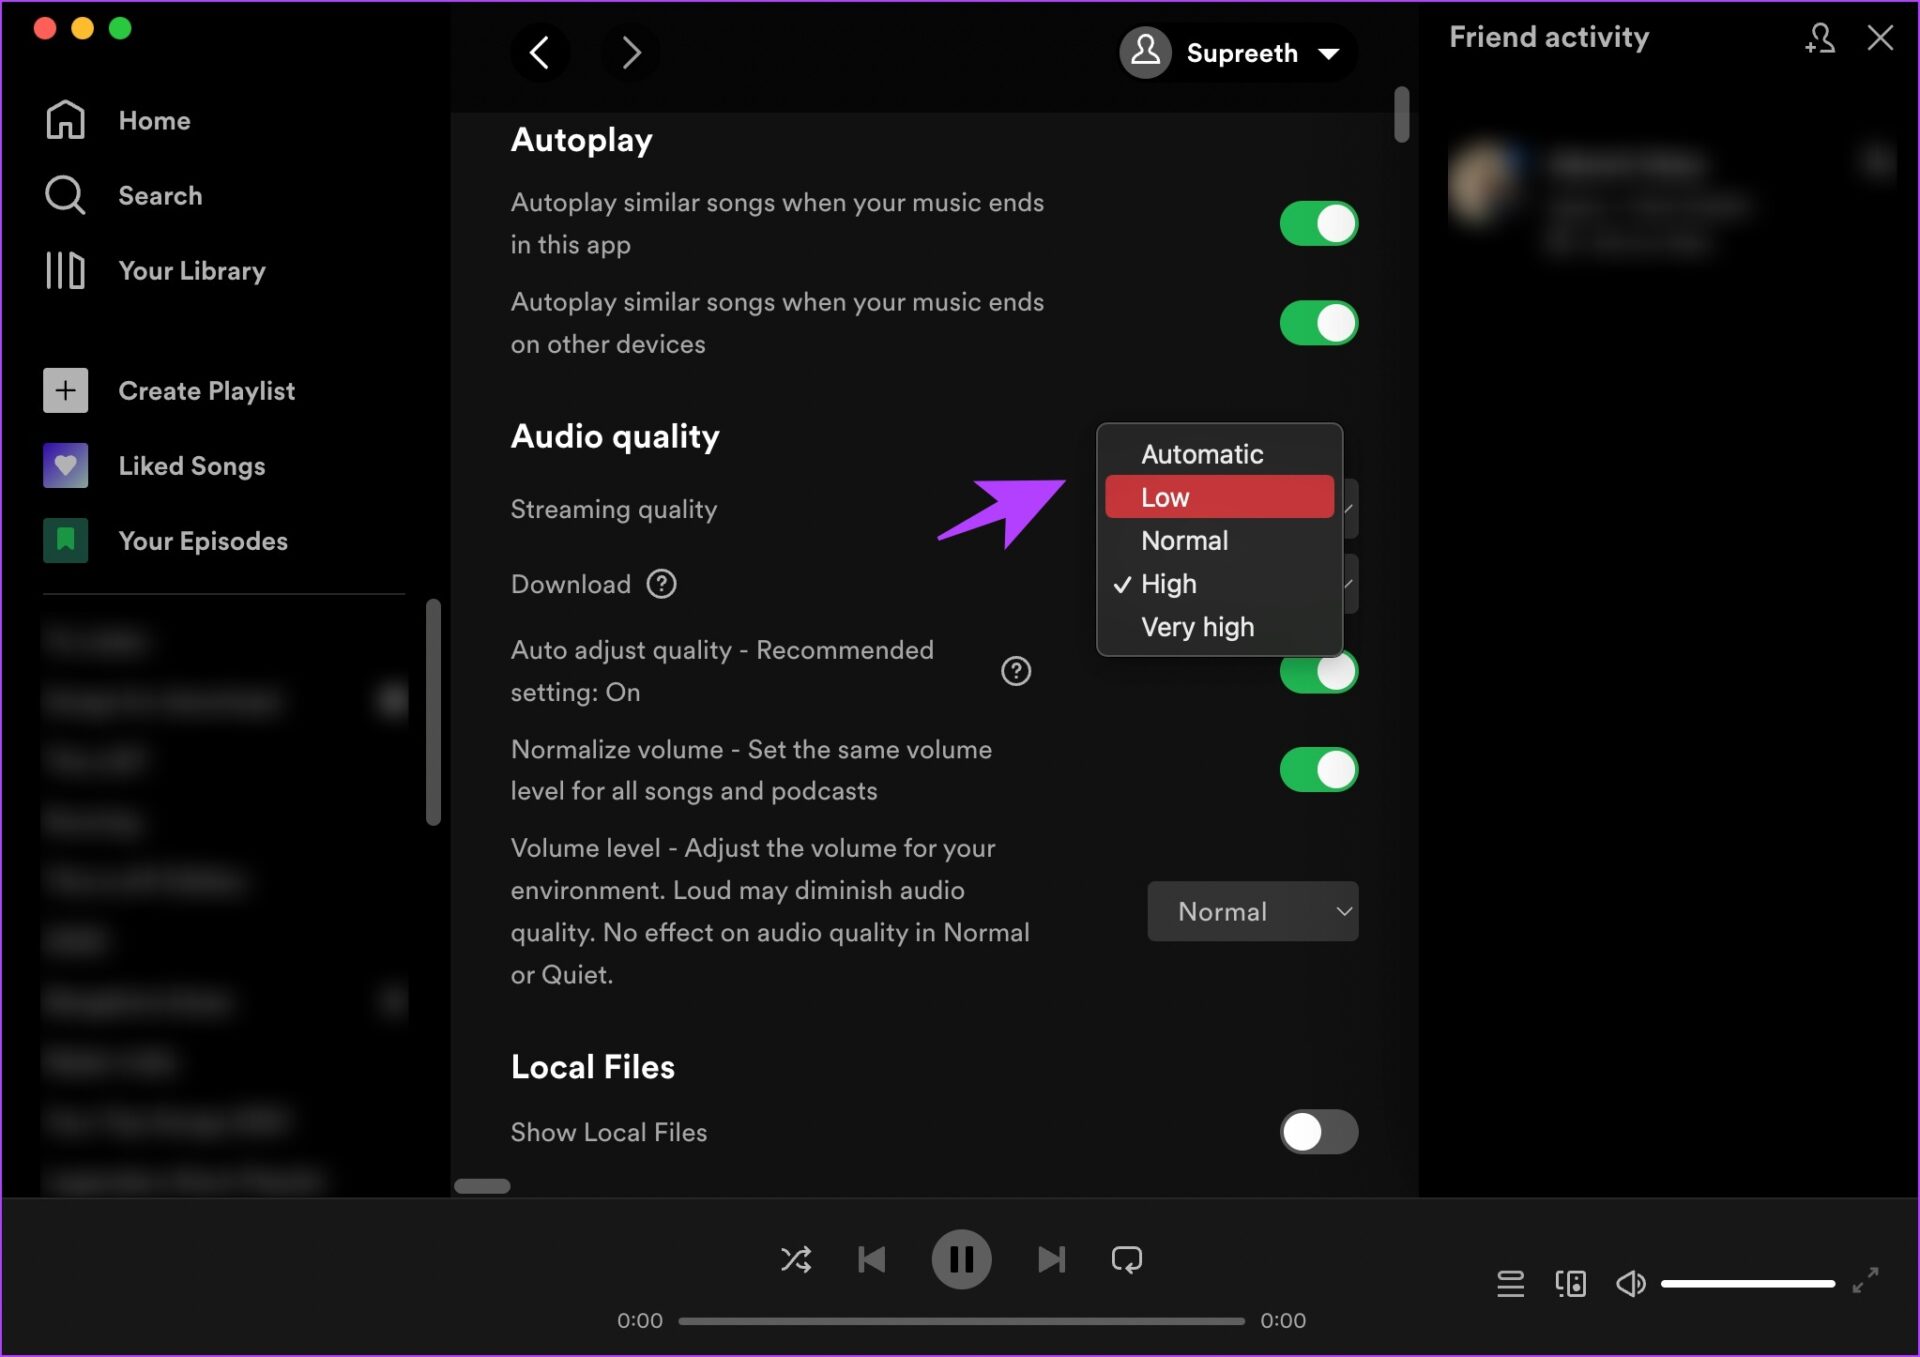
Step 1: Click on Spotify in the toolbar after opening the Spotify app and go to Preferences. Step 2: Click on the dropdown menu next to Download. Step 3: Select your download size. If you use a Windows machine, the procedure is quite similar. Here’s how you can change the download quality on your PC.
Save Spotify Downloads in Lower Quality on Windows
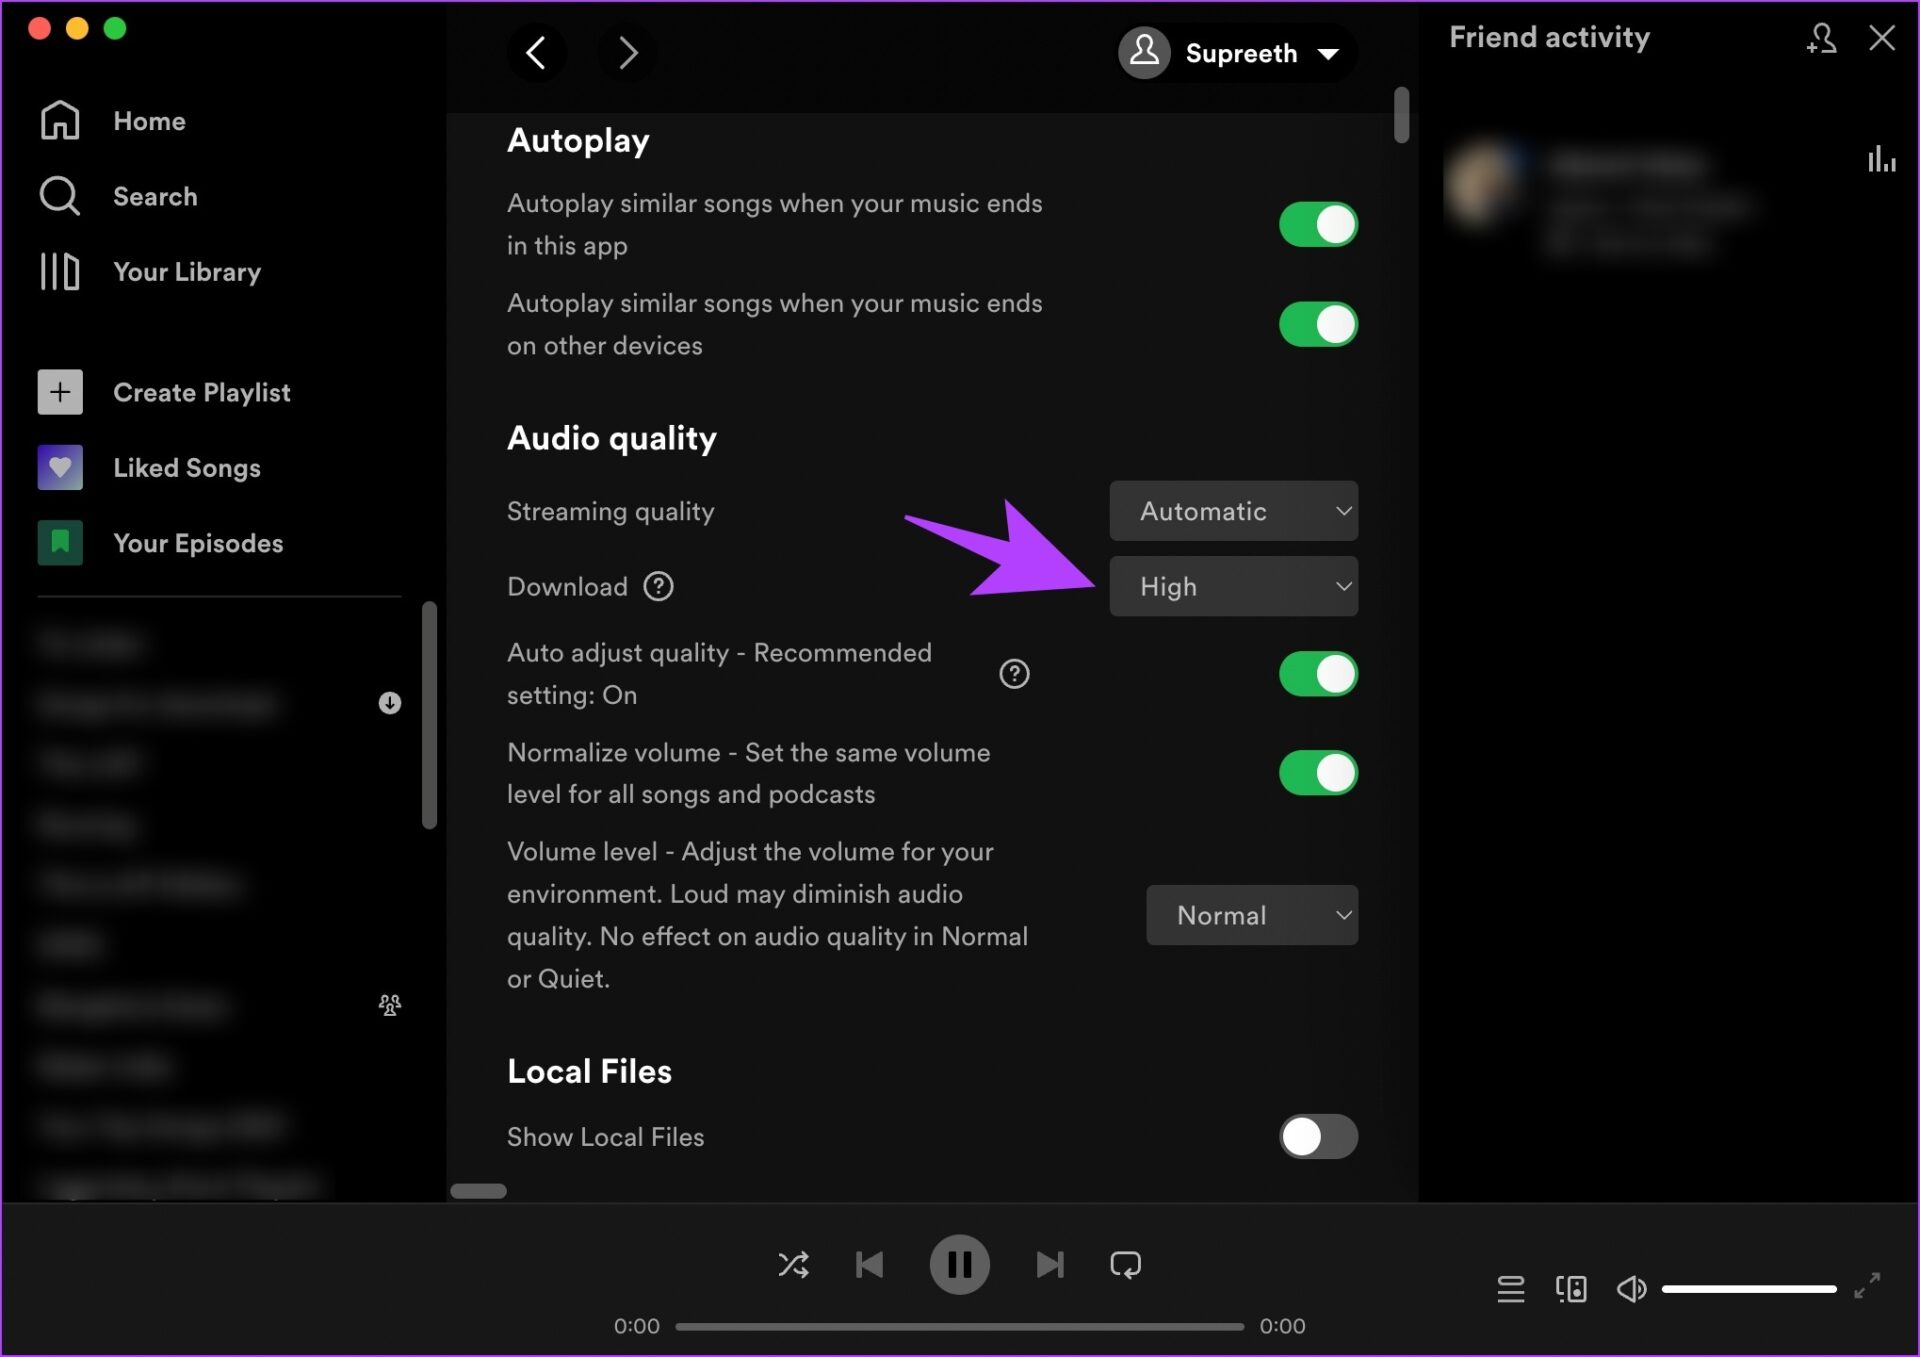
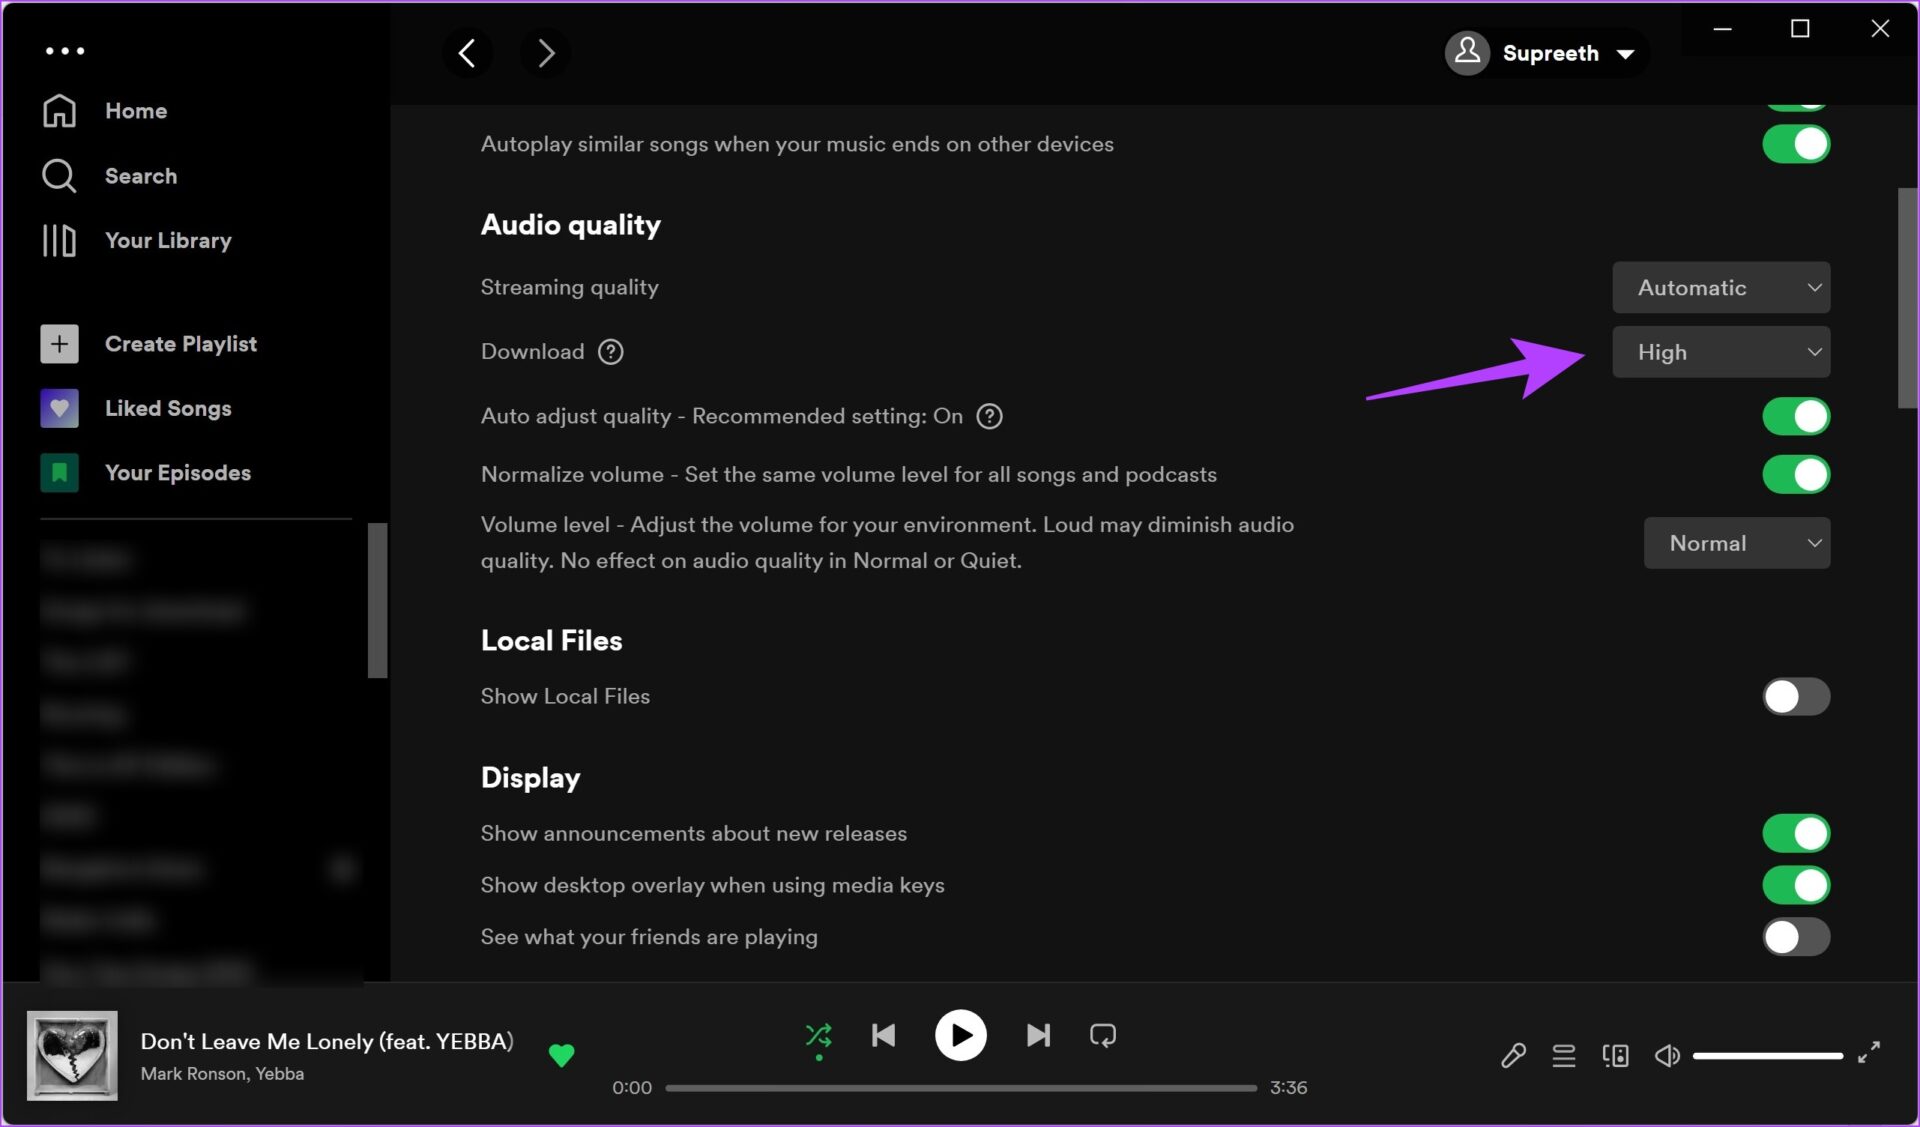
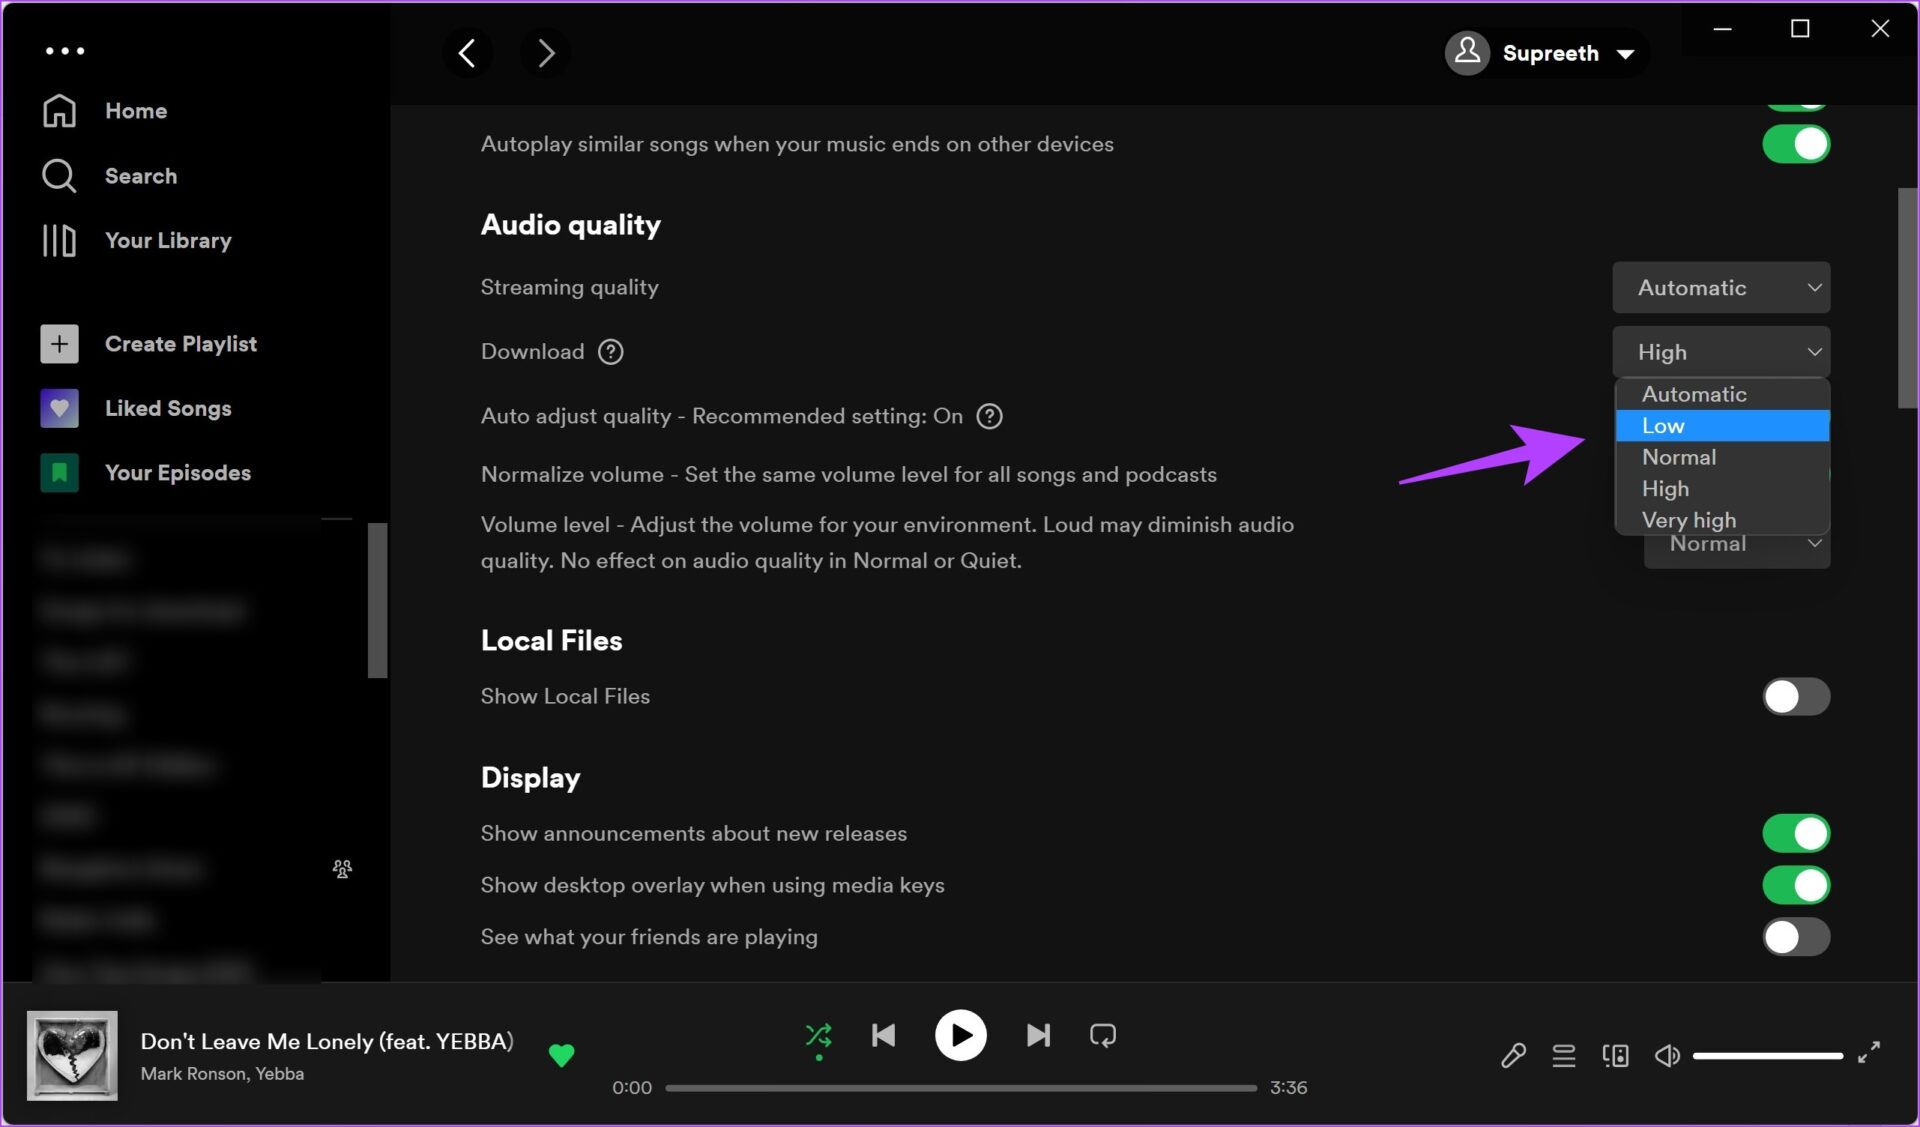
Step 1: Click on your username in the Spotify app and select Settings. Step 2: Click on the dropdown menu next to downloads. Step 3: Now, select your download quality. These are all the methods to free up storage space occupied by downloaded files on Spotify. We hope you keep a check on what all playlists you have the download option enabled for.
Clear Storage Space on Spotify With Ease
This is everything you need to know, about why Spotify takes so much space on your device and how you can delete cache and follow other methods above to reduce the storage space. We recommend you perform a Spotify storage check and clean up every two weeks. And that is a good enough reason to save this article and come back to it when needed. The above article may contain affiliate links which help support Guiding Tech. However, it does not affect our editorial integrity. The content remains unbiased and authentic.











![]()
