No, it’s not a setting that you’ve mistakenly enabled. And yes, you can remove SOS only from your iPhone status bar. How? Follow along to get all the answers.
What Does SOS Only Mean on iPhone
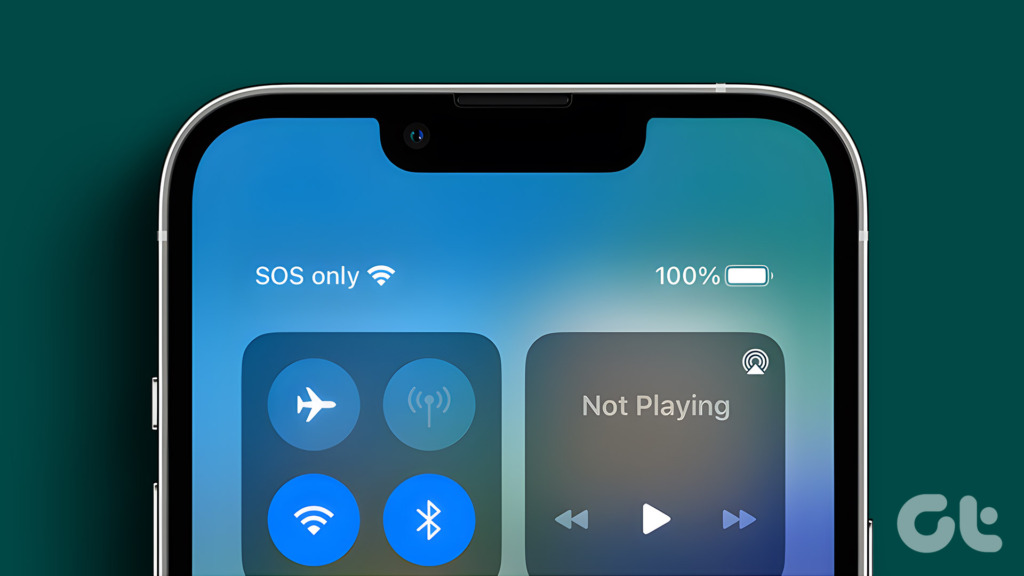
If your iPhone is unable to properly connect to a cellular network, you can spot an SOS or SOS only at the top-right corner in iOS 16 and the top-left corner in iOS 15 and earlier. This indicates that you can’t make or take phone calls, send messages, or use cellular data. However, you can use the emergency SOS service and make a call to 911 or concerned authorities. The simplest explanation is that you are not in the coverage area. Although, the feature is limited to the United States, Canada, and Australia. Everywhere else, you’ll see a No Service or Searching error in the status bar. So let’s move on to the fixes for the SOS only error. Note: If you’re seeing the No Service error, here’s how to fix the No Service error issue.
How to Fix SOS Only on iPhone
If it’s not a problem with your network coverage, try the below steps to turn off SOS only on iPhone.
1. Turn Off and On Cellular Data
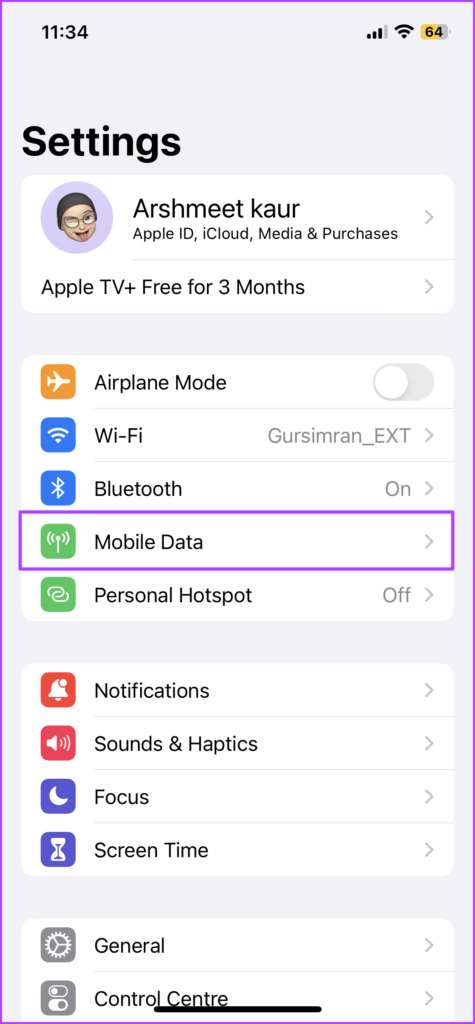
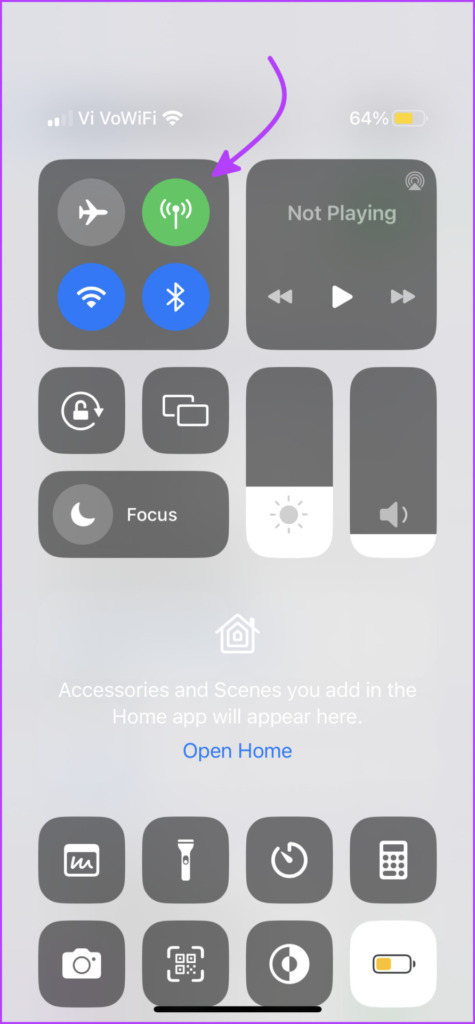
Your iPhone might be stuck in the SOS-only state due to a network error. And when you disable and then enable Cellular Data, it attempts a fresh connection, mostly fixing up the error. Step 1: Go to Settings and tap Cellular/Mobile Data. Step 2: Toggle off Cellular Data /Mobile Data. Step 3: Wait for a few seconds, then Toggle on Cellular Data /Mobile Data. Alternatively, you can also invoke the Control Center and tap the Cellular Data icon to disable it. Tap it after a few seconds to enable it. If your phone still says SOS at the top status bar, hop on to the next fix.
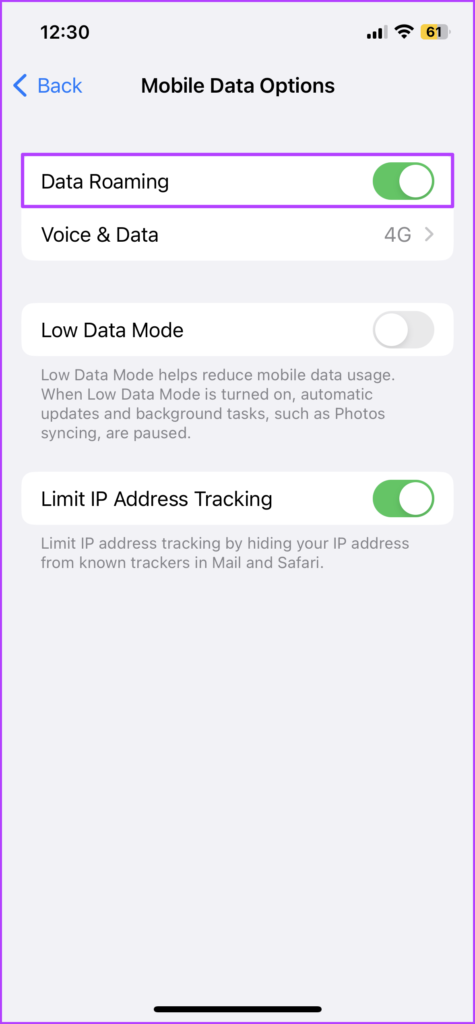
2. Enable Data Roaming
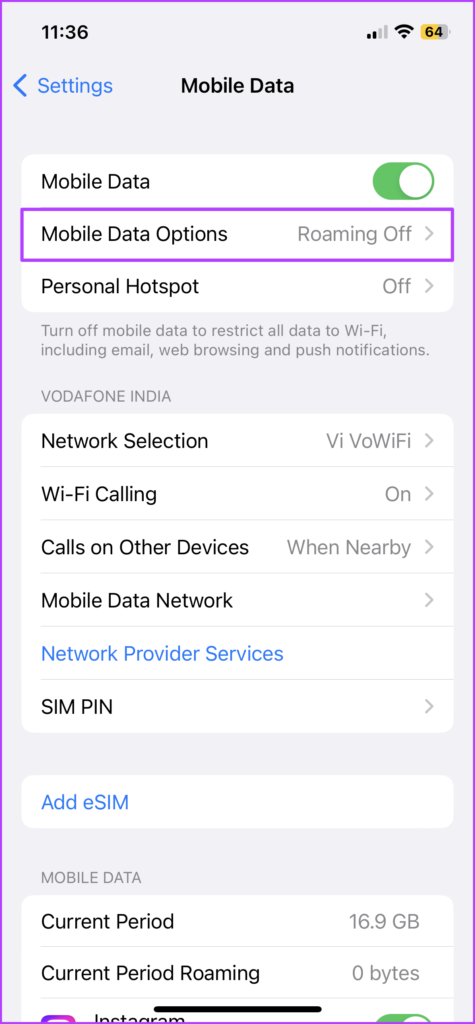
The culprit behind the SOS only on iPhone might be the disabled data roaming option. So, if you’re traveling, check this setting before moving on. Step 1: Launch Setting → Cellular/Mobile Data. Step 2: Tap Cellular Data Options/ Mobile Data Options. Step 3: Toggle on Data Roaming. Hopefully, either 4G or 5G will pop up in the status bar instead of SOS.
3. Switch to 4G or LTE
5G is still not fully functional across the globe and it might affect your signal strength and connection. So, it’s wiser to disable 5G on iPhone and stick to 4G if this problem persists.
4. Restart to Fix SOS Only on iPhone
The most convenient and quoted troubleshooting method. Remarkably, it mostly works in our favor as well. Basically, resetting the caches can resolve any bug or settings errors, allowing a stable network connection and fixing the issue at hand.
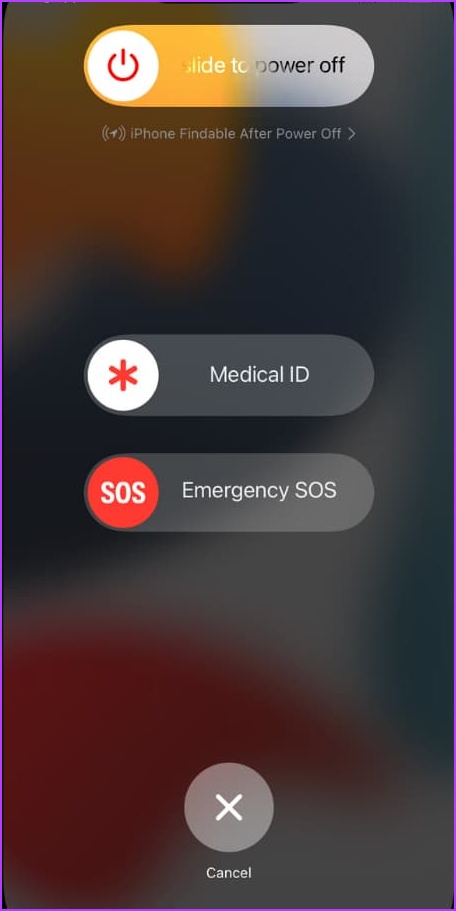
For iPhone with Face ID: Press and hold the volume up/down and the side button simultaneously until the power-off slider appears. Slide to turn off the phone.
For iPhone with Touch ID: To bring the power slider screen, press and hold the side button. Drag the power slider to turn off the device.
After the device shuts down, press and hold the power button to restart.
5. Update Carrier Settings
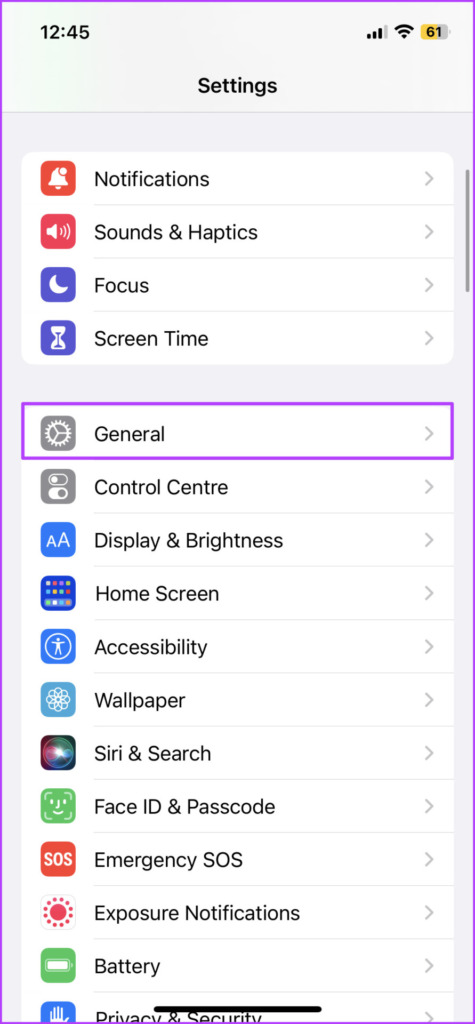
Provided by the carrier, these settings are designed to improve cellular connectivity and overall performance. Although usually done automatically, you can also check and manually update carrier settings on iPhone. But before we see how, ensure that your device is connected to a stable Wi-Fi and Cellular Data is turned on. Step 1: In Settings, go to General. Step 2: Tap About. Step 3: If an update is available, a pop-up will appear; click Update to install. If you’re setting up an eSIM or did one recently, you might need to manually download the new carrier settings. Once updated, the network bars should return to the status bar, otherwise, try out the next step.
6. Disable and Enable Automatic Network Selection
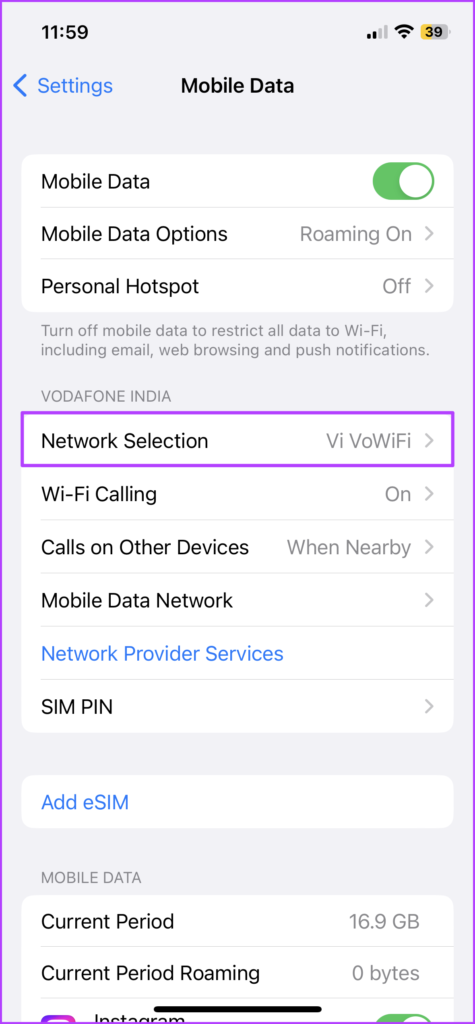
This setting ensures that you’re connected to the right network (carrier), allowing a stable network connection. Turning it off and on pushes the device to re-establish the connection with the network, helping you turn off SOS only on the iPhone. Step 1: Go to Settings → Cellular/Mobile Data. Step 2: Select Network Selection. Step 3: Toggle off the switch next to Automatic. Step 4: After a few seconds, toggle it back on.
7. Re-Insert SIM
While this doesn’t happen often, the physical SIM card could disrupt the network connectivity. And a simple reset will help you get rid of SOS-only on iPhone. So, take out the SIM from your device, restart your iPhone and then re-insert the SIM. Note: Unless directed by the carrier, don’t reset the eSIM as then you’ll have to set it up as new.
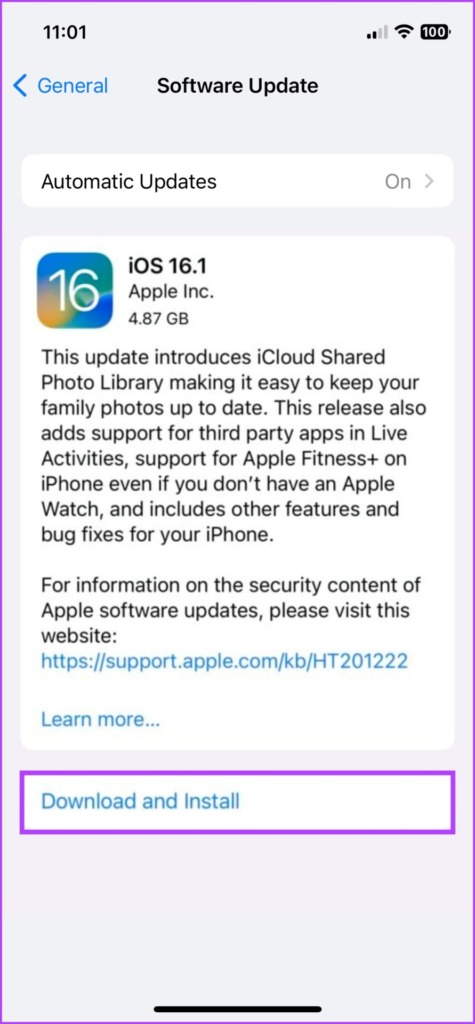
8. Update iOS
You could be seeing the SOS symbol because of a software issue. Gratefully, you can easily resolve it with an OS update. So, check if an update is available and install it. Step 1: Go to Settings and tap General. Step 2: Select Software Update. Step 3: If available, tap Download and Install.
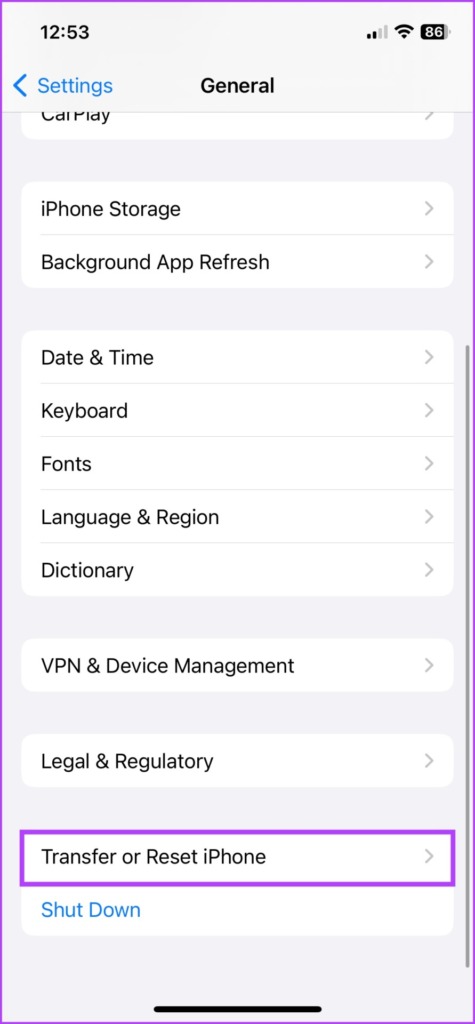
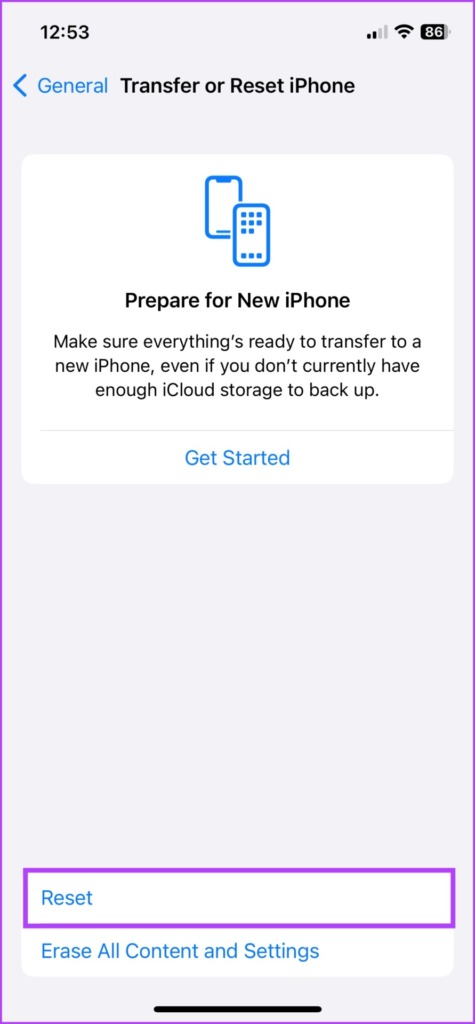
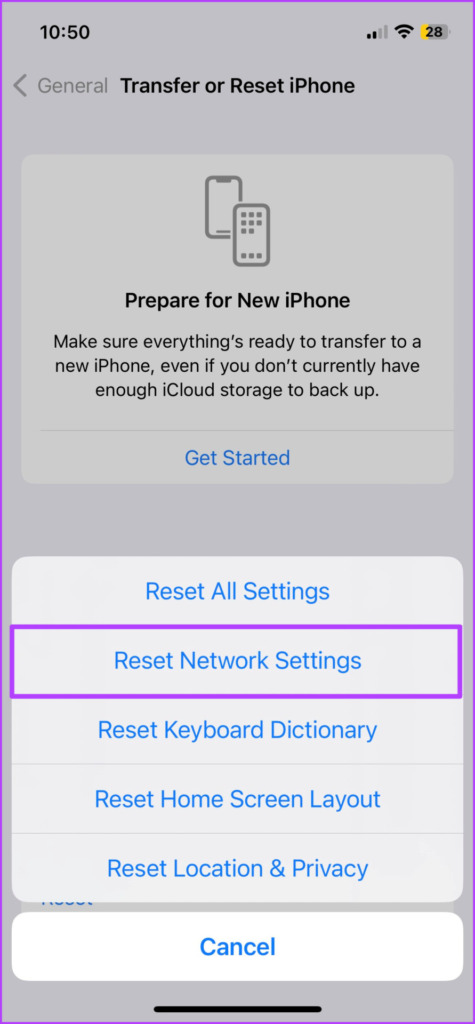
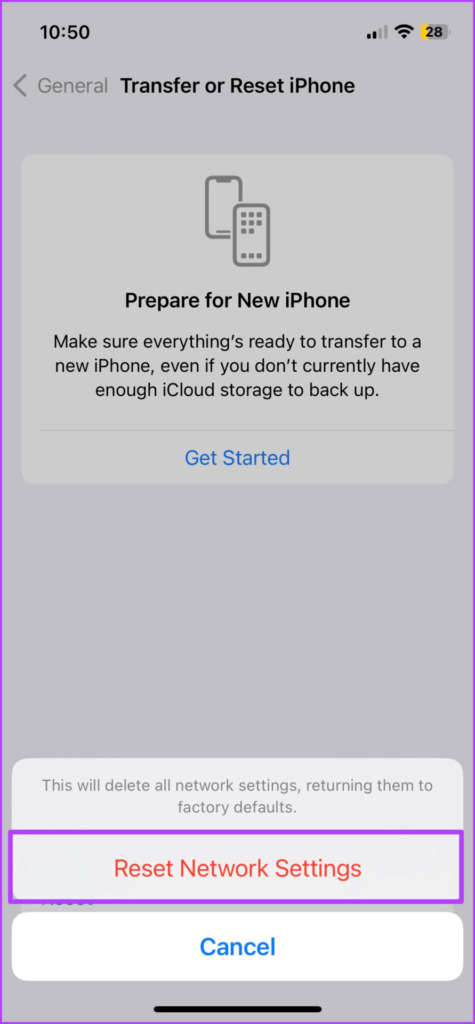
9. Reset Your Network Settings
If the above methods didn’t get rid of SOS only on iPhone, it’s time to try the ultimate troubleshooting step. Why ultimate? Because it will erase stored Bluetooth devices, Wi-Fi passwords, VPN configurations, and more. So, jot down all the necessary details before you proceed with this method. Step 1: Launch Settings and go to General. Step 2: Scroll down and select ‘Transfer or Reset iPhone’. Step 3: Here, select Reset. Step 4: Tap Reset Network Settings and enter the passcode if prompted. Step 5: Tap Reset Network Settings again to confirm the action.
10. Contact your Carrier
We’ve covered almost all facets. However, if you still see SOS or SOS only next to the Wi-Fi icon, only your carrier can help you out of the situation. So, get on a call with them and get this thing fixed. Notably, they will initially suggest you repeat these steps, so do tell them the troubleshooting efforts you’ve already made. If even this effort doesn’t yield some fruitful results, try contacting Apple Support for a solution,
SOS Only in iOS 16
So, are you wondering if there’s any correlation between Apple’s latest Emergency SOS via Satellite calling feature and this issue? The answer is a no and a yes. No, because the feature is limited to the iPhone 14 series (and maybe above). And a yes, as there are chances that the supporting iOS 16 has mistakenly tweaked some settings in your iPhone. Hopefully, these fixes helped you turn off SOS only. The above article may contain affiliate links which help support Guiding Tech. However, it does not affect our editorial integrity. The content remains unbiased and authentic.